Dashboard Overview
 (1).png)
This section provides a complete summary of your business performance including sales, purchase, income, expense and stock alerts.
🔹 Total Sales
(Shows total sales amount for selected period)
🔹 Total Purchase
(Displays total purchase value)
🔹 Total Income
(Shows overall profit or income generated)
🔹 Total Expense
(Displays total recorded expenses)
🔹 Revenue Graph
(Shows monthly profit/loss visualization)
🔹 Year Filter
(Used to change financial year view)
🔹 Low Stock Panel
(Shows products that are below alert quantity)
(Shows total sales amount for selected period)
🔹 Total Purchase
(Displays total purchase value)
🔹 Total Income
(Shows overall profit or income generated)
🔹 Total Expense
(Displays total recorded expenses)
🔹 Revenue Graph
(Shows monthly profit/loss visualization)
🔹 Year Filter
(Used to change financial year view)
🔹 Low Stock Panel
(Shows products that are below alert quantity)
POS Billing
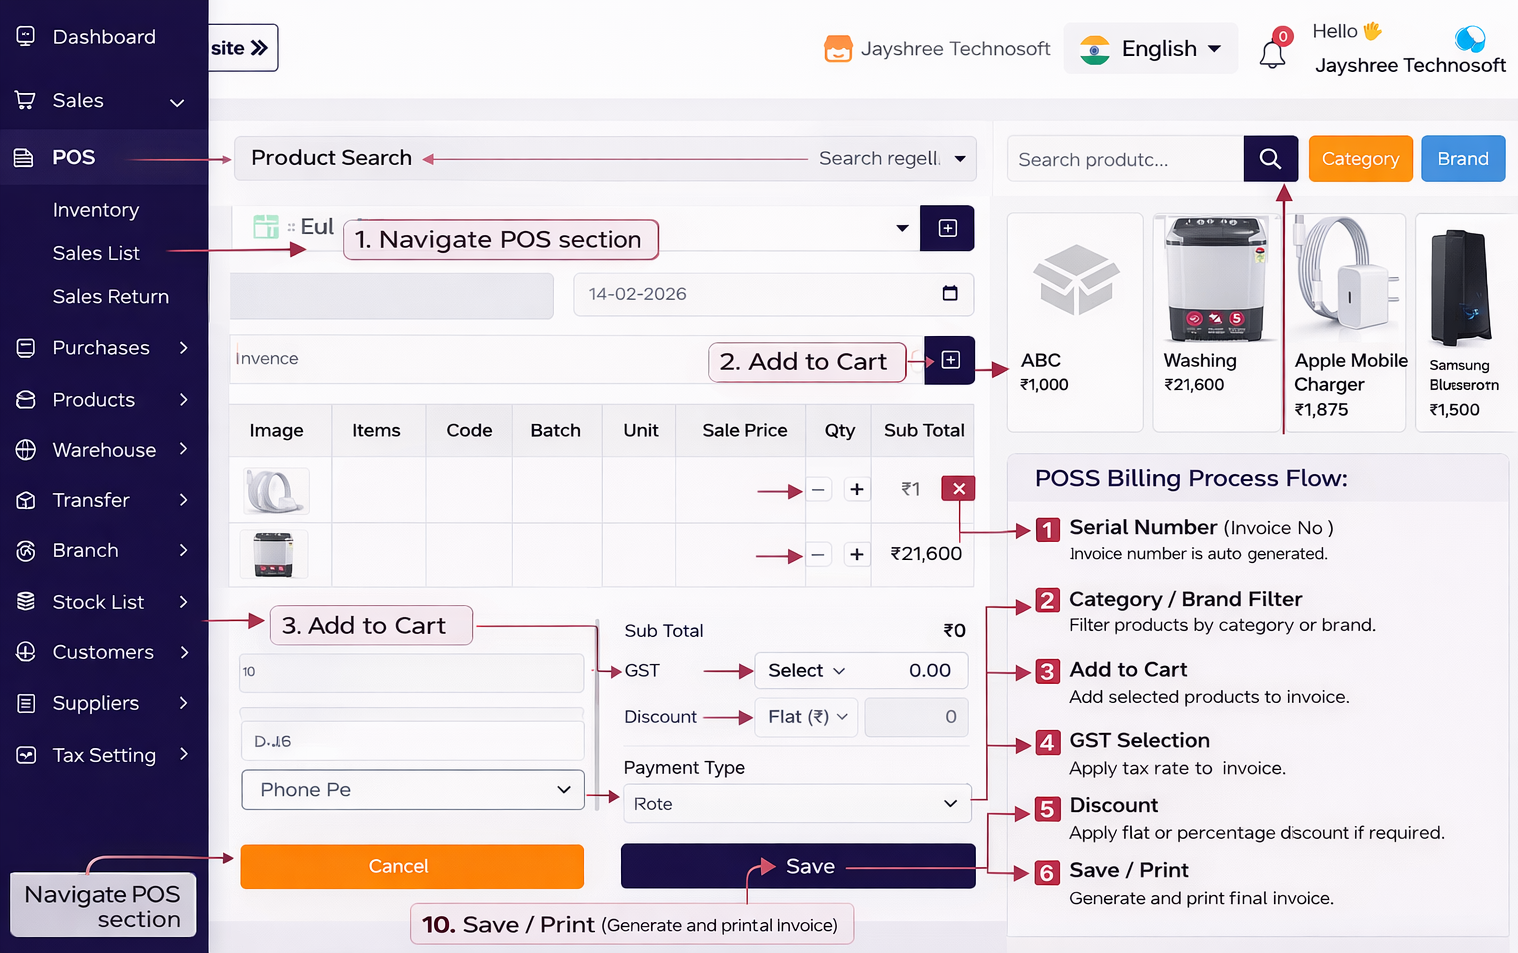
1
Sales
2
POS
3
Verify Invoice Details
4
Select Customer
5
Select Product
6
Adjust Quantity
7
Apply GST (Tax)
8
Apply Discount (If Required)
9
Enter Receive Amount
10
Select Payment Type
11
Save Invoice
12
Invoice Generation
POS Billing Process – Step-by-Step Guide
Step 1: Open POS Module
Navigate to:
Sales → POS
Step 2: Verify Invoice Details
The Invoice Number (Serial No.) is auto-generated for each new bill.
Select or confirm the Billing Date.
Step 3: Select Customer
Choose the customer from the dropdown list.
If the customer has any previous outstanding balance, the Due Amount will automatically be displayed.
Step 4: Select Product
From the product panel (right side), click on the desired product to add it to the invoice.
Step 5: Adjust Quantity
Use the (+ / –) buttons to increase or decrease the product quantity.
Step 6: Apply GST (Tax)
Select the applicable GST rate from the dropdown menu.
The tax amount will be calculated automatically.
Step 7: Apply Discount (If Required)
You can apply:
Flat Amount Discount (₹)
or
Percentage Discount (%)
The total amount will update automatically.
Step 8: Enter Receive Amount
Enter the amount received from the customer in the Receive Amount field.
If the full amount is not received, the remaining balance will appear as Due Amount.
Step 9: Select Payment Type
Choose the payment method such as:
Cash
UPI
PhonePe
Card
etc.
Step 10: Save Invoice
Click on the Save button to generate the invoice.
Step 11: Invoice Generation
The invoice will be generated in PDF format.
If full payment is not received, the remaining balance will be recorded as Due Amount under the customer account.
Step 1: Open POS Module
Navigate to:
Sales → POS
Step 2: Verify Invoice Details
The Invoice Number (Serial No.) is auto-generated for each new bill.
Select or confirm the Billing Date.
Step 3: Select Customer
Choose the customer from the dropdown list.
If the customer has any previous outstanding balance, the Due Amount will automatically be displayed.
Step 4: Select Product
From the product panel (right side), click on the desired product to add it to the invoice.
Step 5: Adjust Quantity
Use the (+ / –) buttons to increase or decrease the product quantity.
Step 6: Apply GST (Tax)
Select the applicable GST rate from the dropdown menu.
The tax amount will be calculated automatically.
Step 7: Apply Discount (If Required)
You can apply:
Flat Amount Discount (₹)
or
Percentage Discount (%)
The total amount will update automatically.
Step 8: Enter Receive Amount
Enter the amount received from the customer in the Receive Amount field.
If the full amount is not received, the remaining balance will appear as Due Amount.
Step 9: Select Payment Type
Choose the payment method such as:
Cash
UPI
PhonePe
Card
etc.
Step 10: Save Invoice
Click on the Save button to generate the invoice.
Step 11: Invoice Generation
The invoice will be generated in PDF format.
If full payment is not received, the remaining balance will be recorded as Due Amount under the customer account.
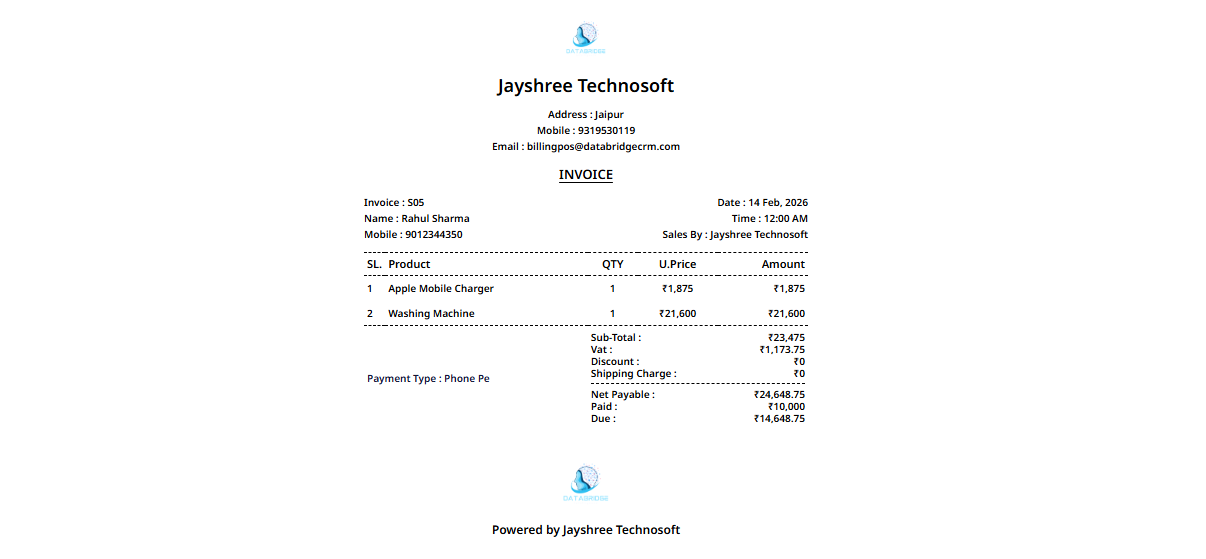
- The invoice will be generated in PDF format.
- If full payment is not received, the remaining balance will be recorded as Due Amount under the customer account.
- If full payment is not received, the remaining balance will be recorded as Due Amount under the customer account.
Purchase Management
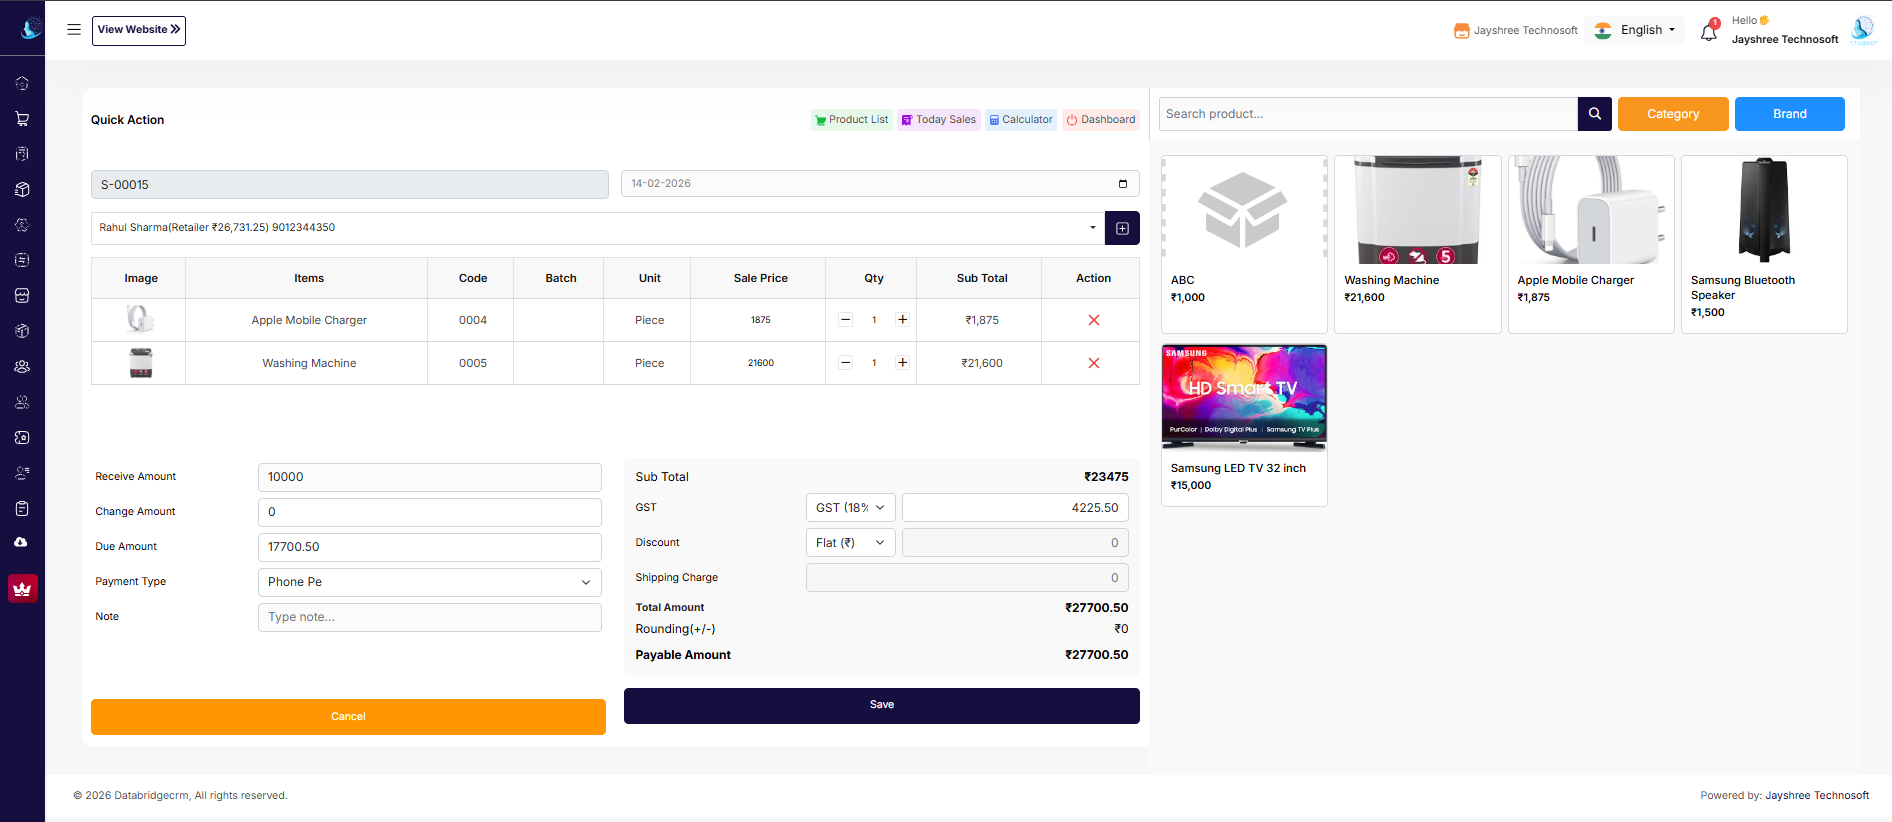
Used to return damaged or extra stock to supplier.
🔹 Select Supplier
(Choose supplier for return)
🔹 Select Products
(Choose products to return)
🔹 Adjust Due
(Adjust return amount in supplier due)
(Choose supplier for return)
🔹 Select Products
(Choose products to return)
🔹 Adjust Due
(Adjust return amount in supplier due)
1
Navigate to Purchase Module
2
Purchases
3
Add Purchase
4
Select Supplier
5
Add Products
6
Set Purchase Price
7
Enter Quantity
8
Apply GST (If Applicable)
9
Apply Discount (If Available)
10
Add Shipping Charges (If Any)
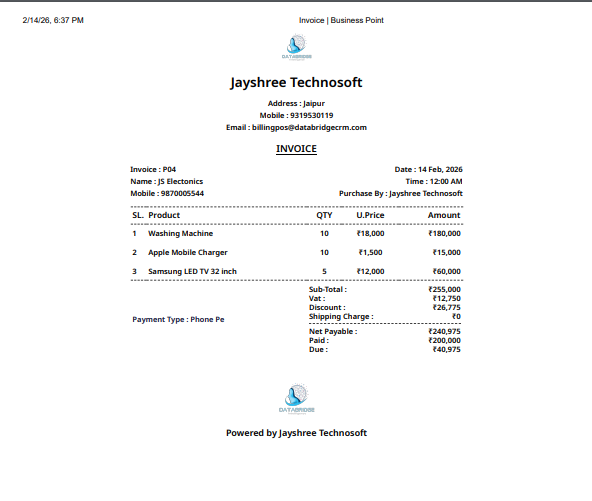
Click Save to finalize the purchase entry.
✔ Stock will be updated automatically
✔ Supplier due amount will be updated
✔ Purchase invoice will be recorded
✔ Stock will be updated automatically
✔ Supplier due amount will be updated
✔ Purchase invoice will be recorded
PURCHASE LIST – Step-by-Step Process
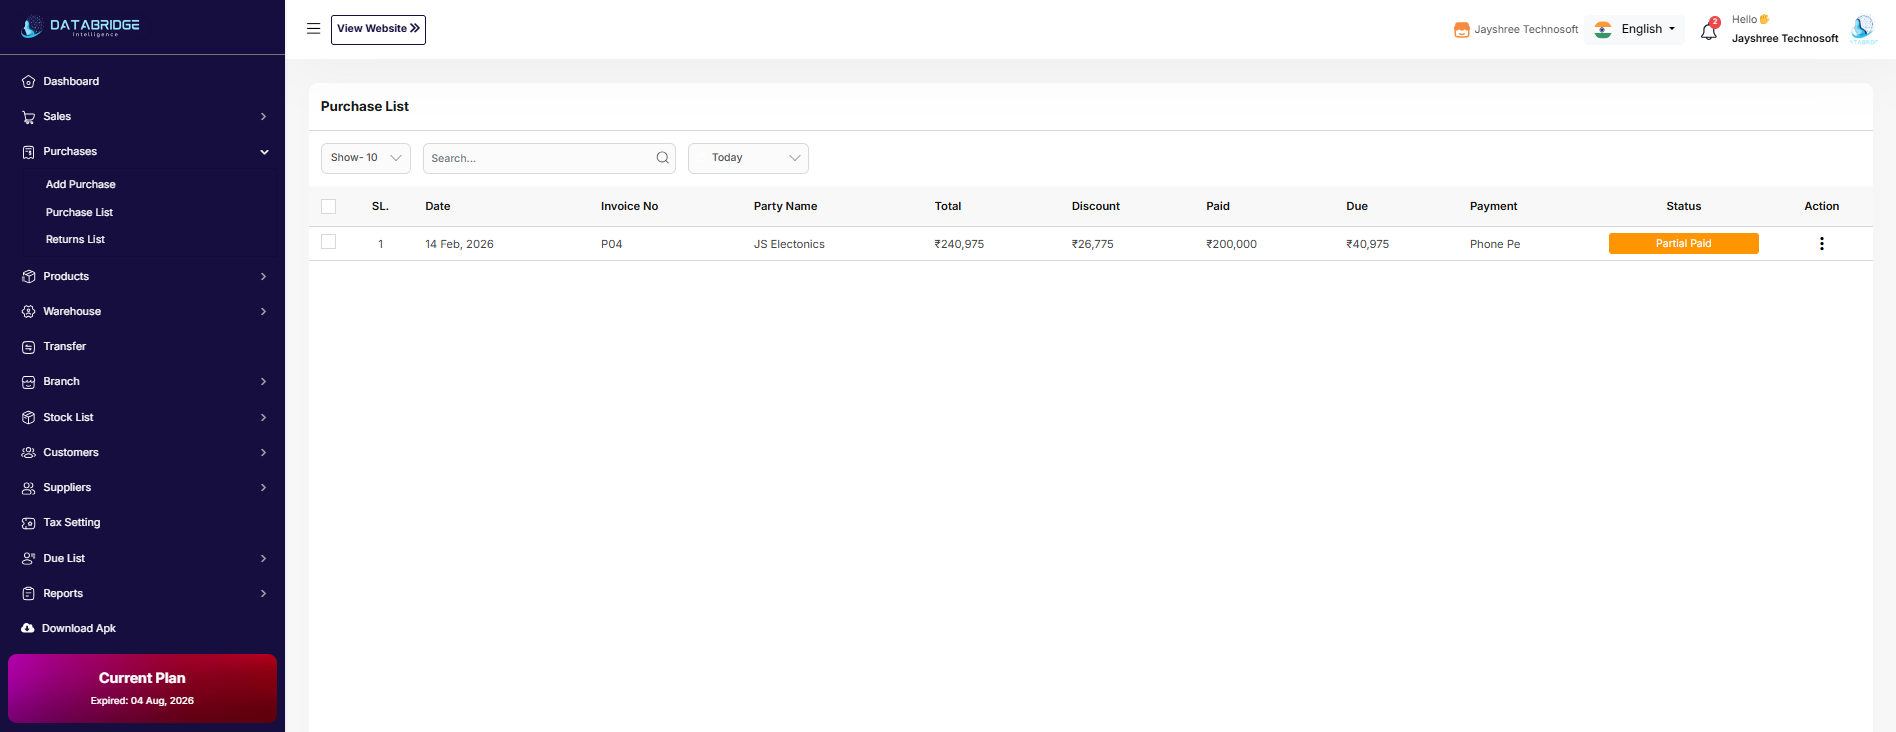
View and manage all purchase records.
Navigate to Purchase List
1
Purchases
2
Purchase List
3
Apply Supplier Filter
4
Apply Date Filter
5
View Details
6
Export Report
PURCHASE RETURN – Step-by-Step Process
1
Navigate to Purchase Return
2
Purchases
3
Purchase Return
4
Select Supplier
5
Select Products for Return
6
Verify Return Amount
7
Adjust Supplier Due
8
Save Return Entry
Product Management
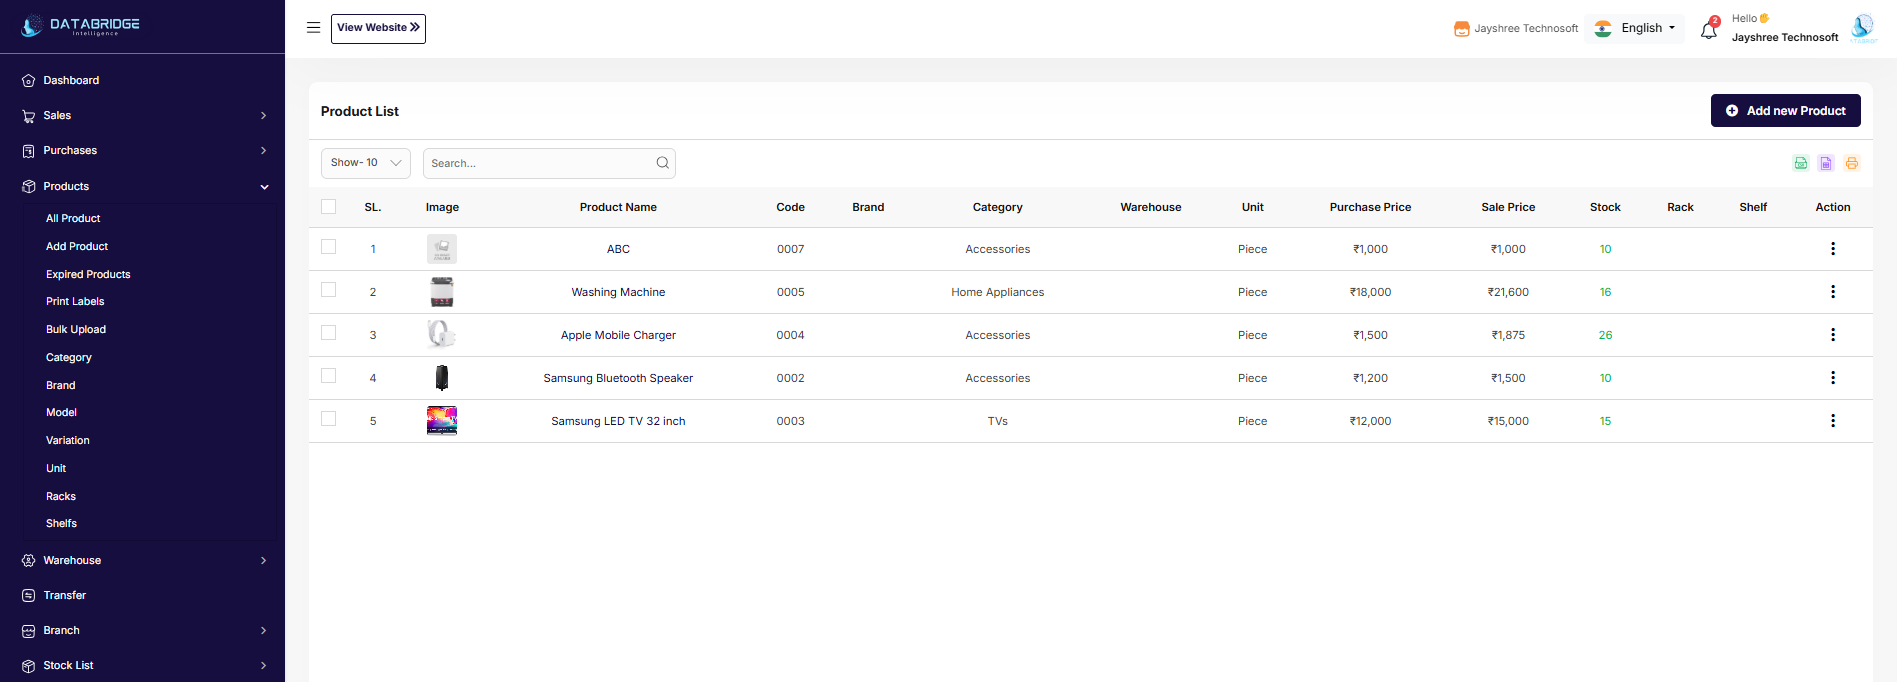
Manage all products including price, stock, category and brand details.
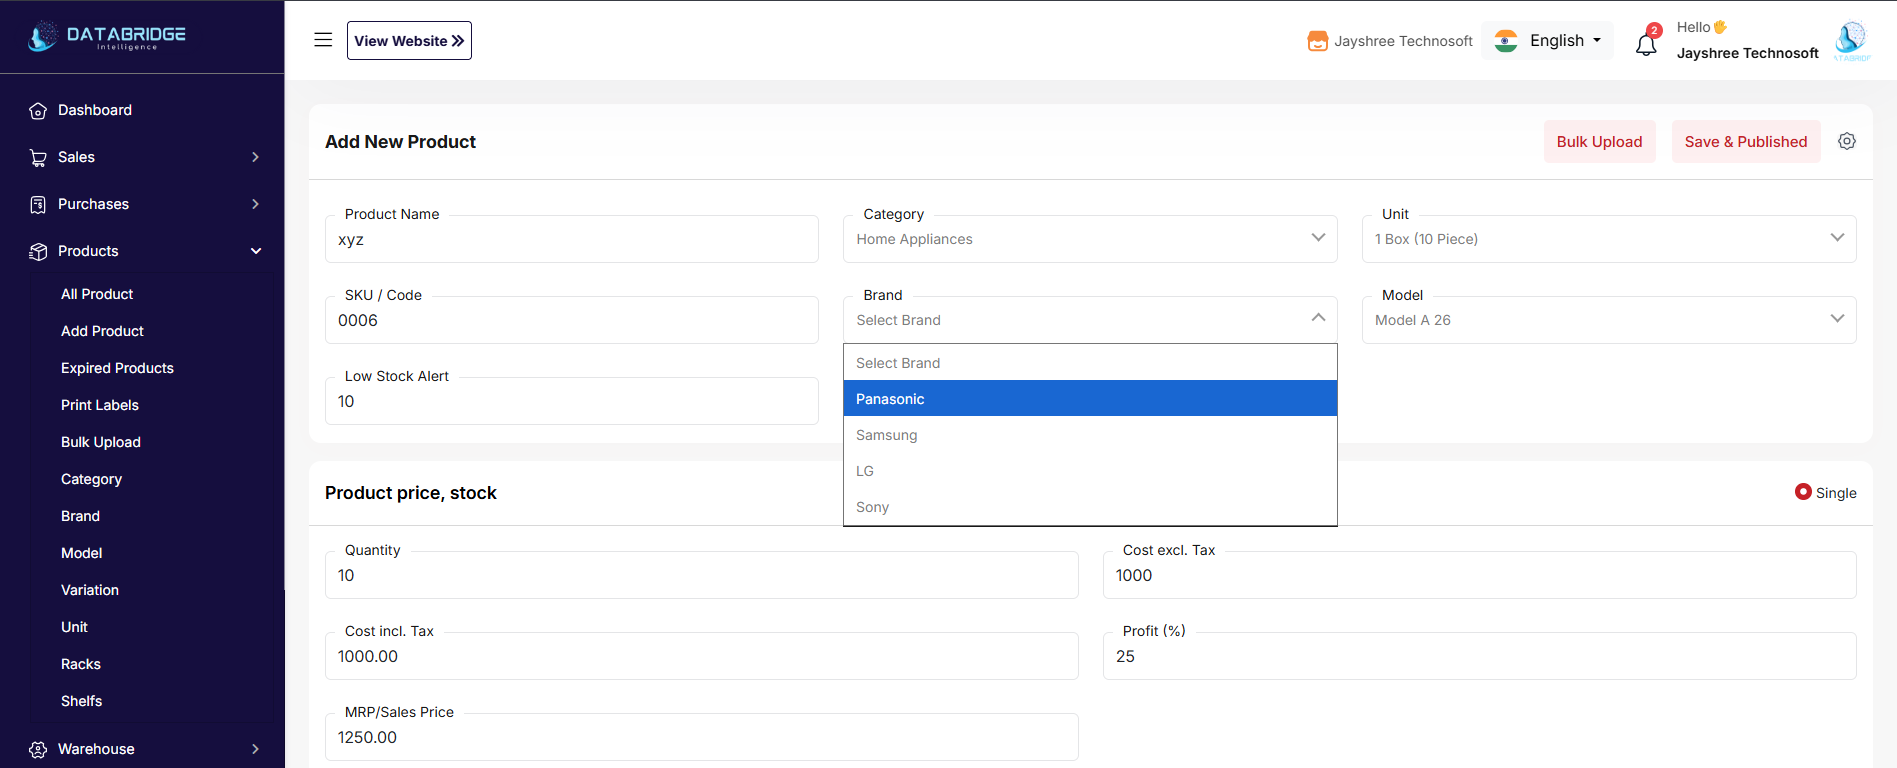
ADD PRODUCT – Step-by-Step Process
1
Products
2
Add Product
3
Enter Product Details
4
Select Category
5
Select Brand
6
Select Model
7
Select Unit
8
Enter Stock & Pricing Details
9
Save Product
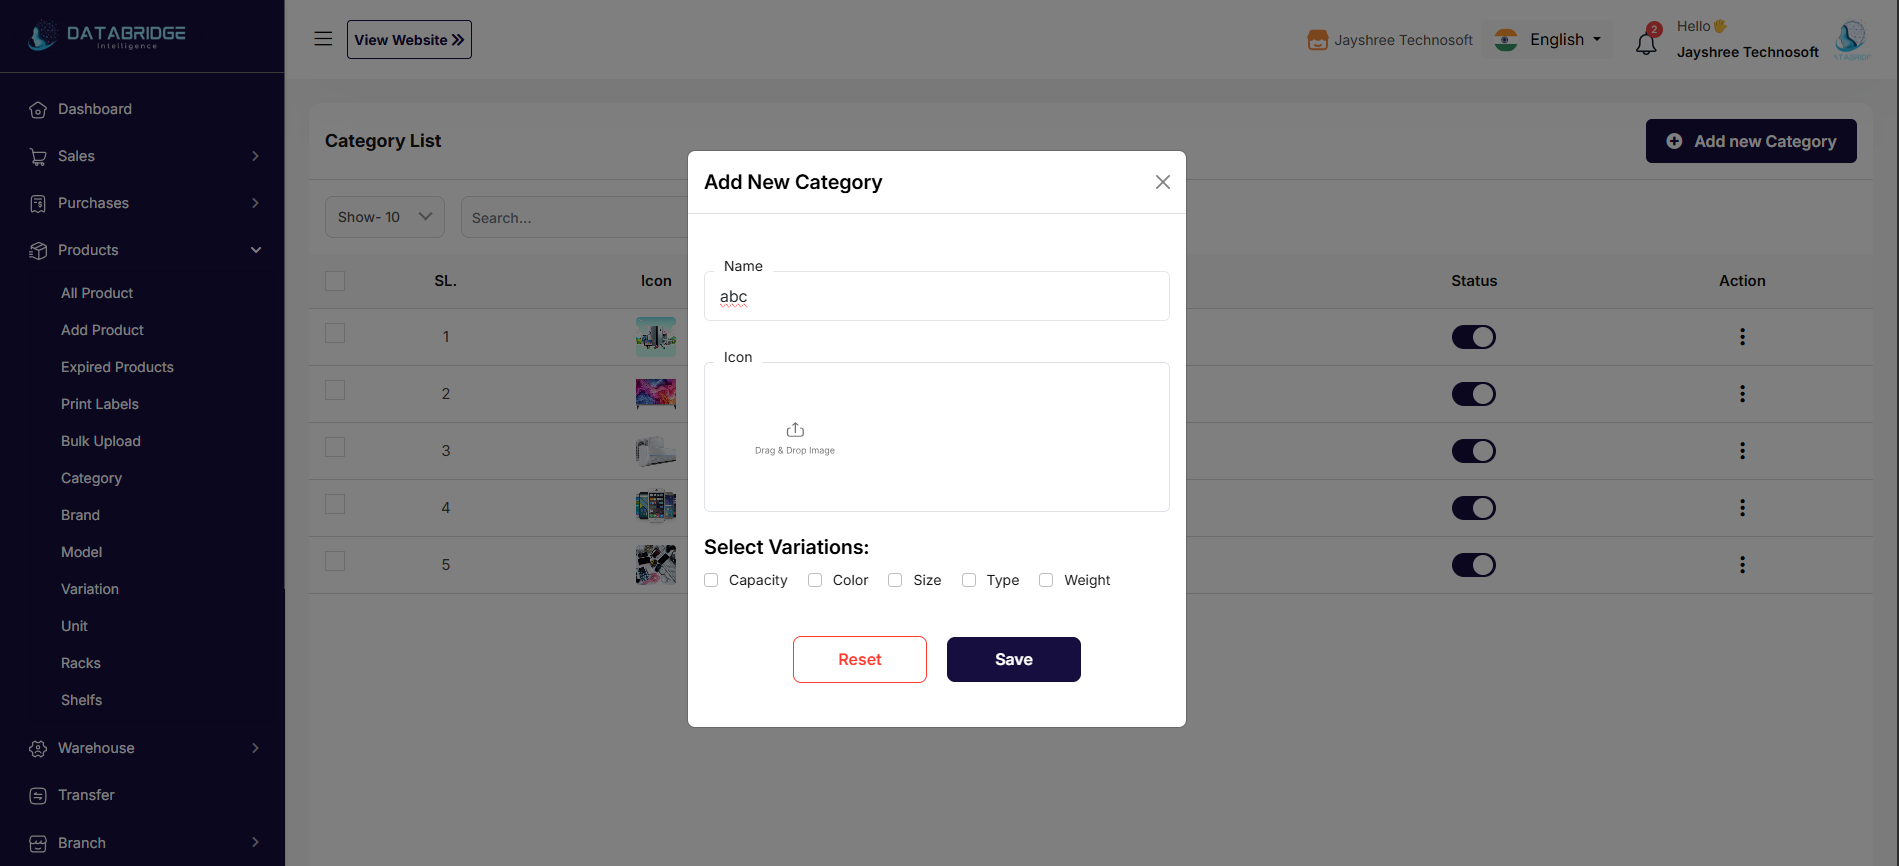
CATEGORY MANAGEMENT
1
Products
2
Category
3
Add Category
4
Enter category name
5
Save
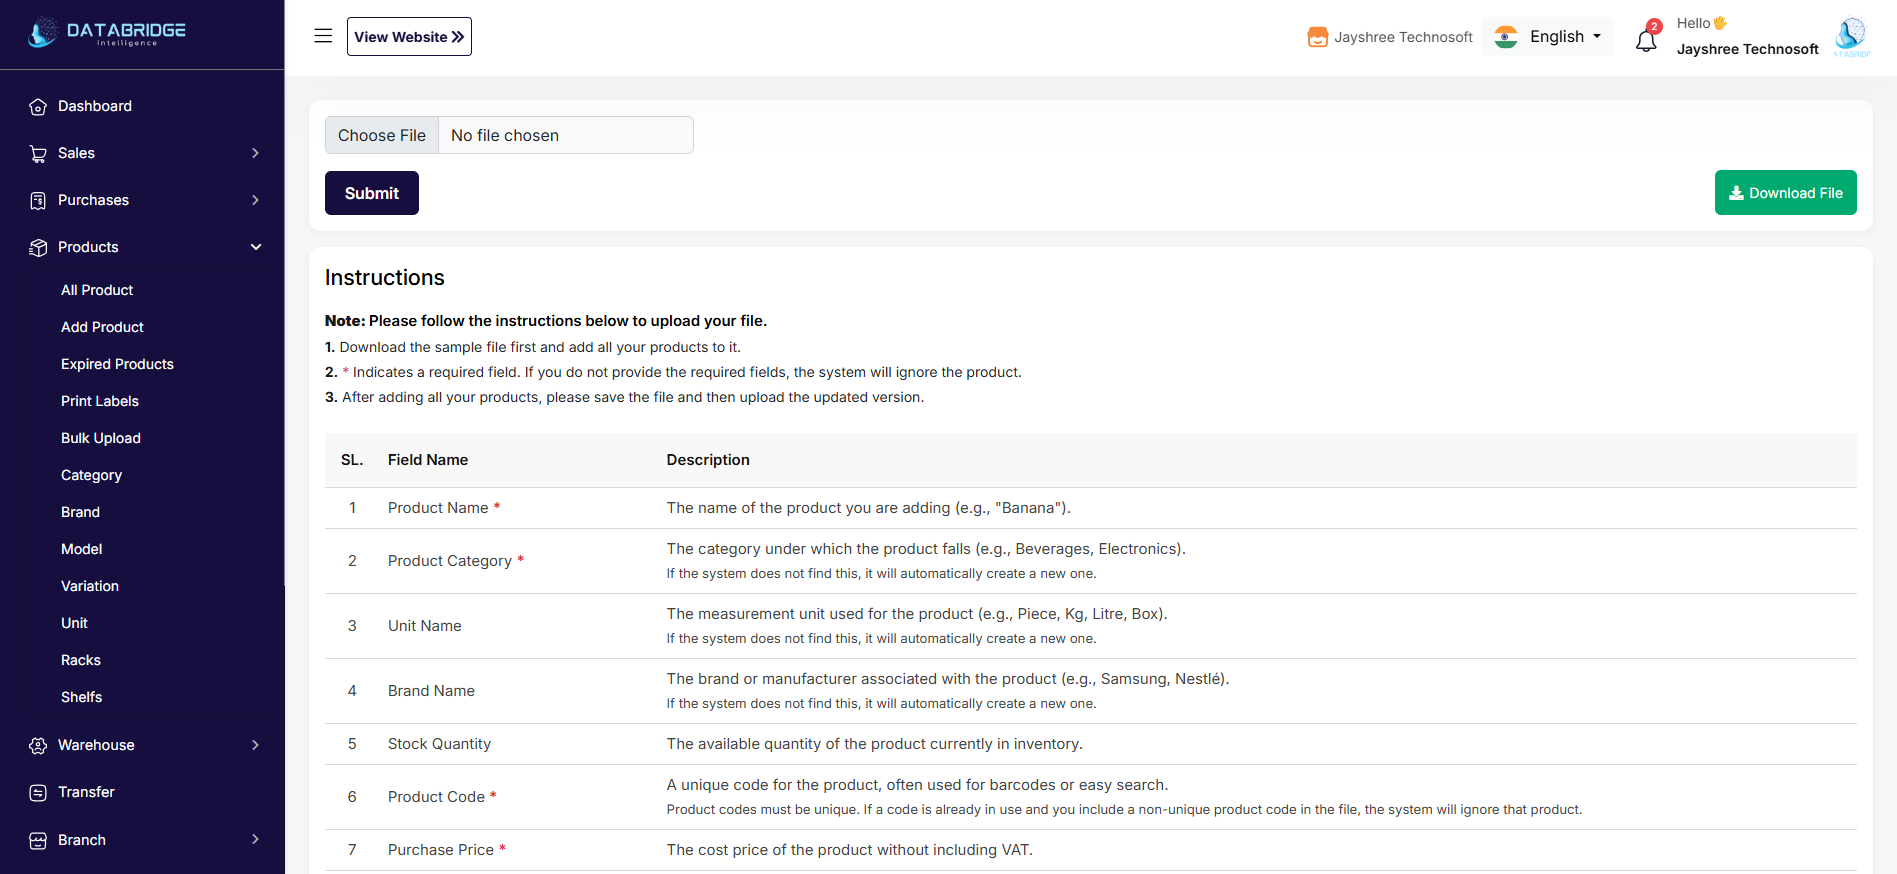
BULK UPLOAD
Products → Bulk Upload
Steps:
Download sample Excel format
Fill product details in sheet
Upload file
Submit
✔ Multiple products can be added at once
✔ Saves time for large inventory
Products → Bulk Upload
Steps:
Download sample Excel format
Fill product details in sheet
Upload file
Submit
✔ Multiple products can be added at once
✔ Saves time for large inventory
1
Products
2
Bulk Upload
3
Download sample Excel format
4
Fill product details in sheet
5
Upload file
6
Submit
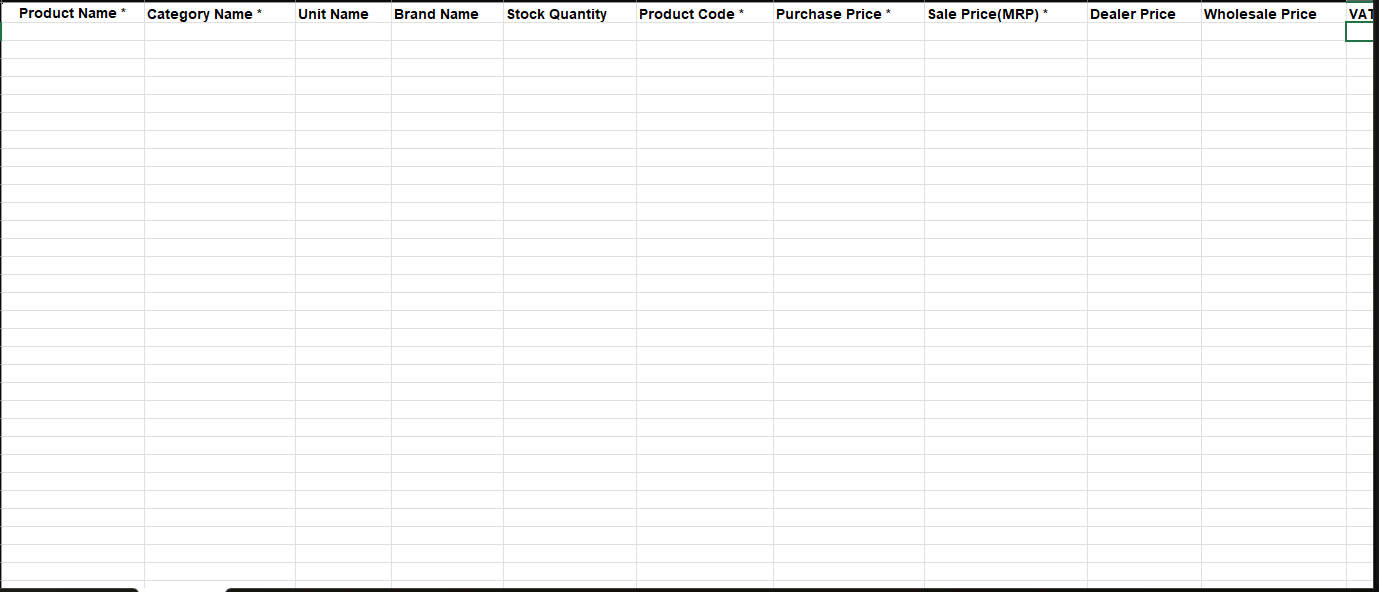
- Download sample Excel format
- Fill product details in sheet
- Fill product details in sheet
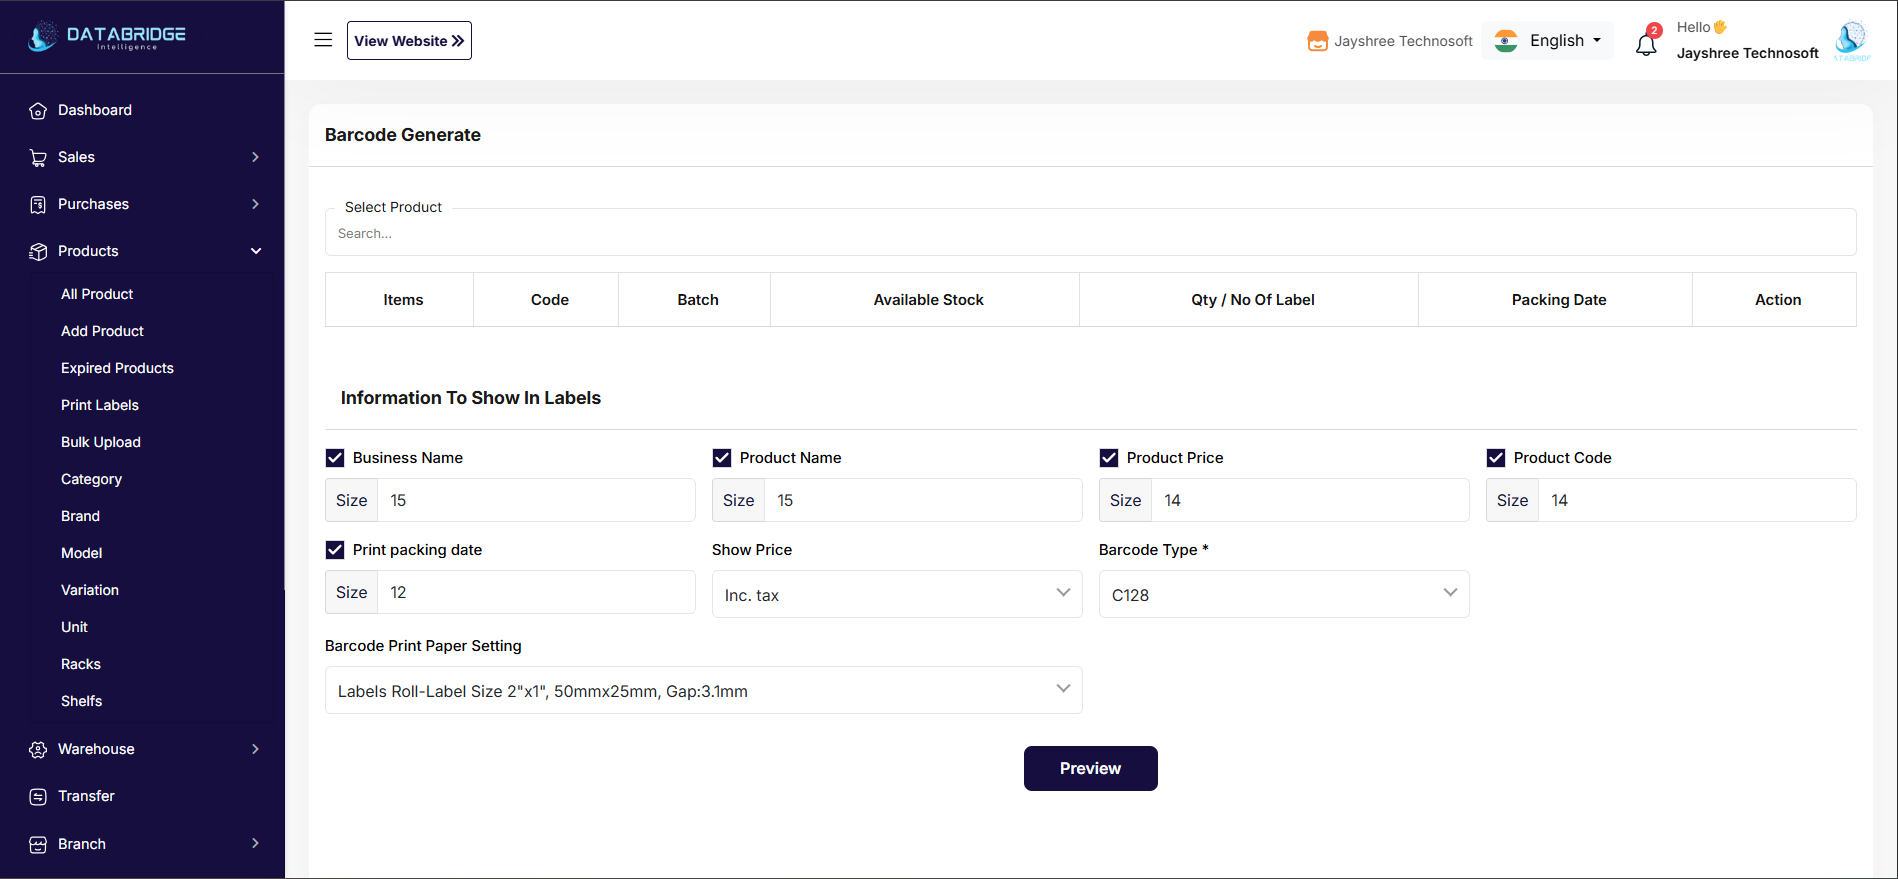
PRINT LABELS
(Print barcode or product labels)
(Print barcode or product labels)
1
Products
2
Print Labels
3
Select products
4
Choose label format
5
Click Print
Warehouse Management
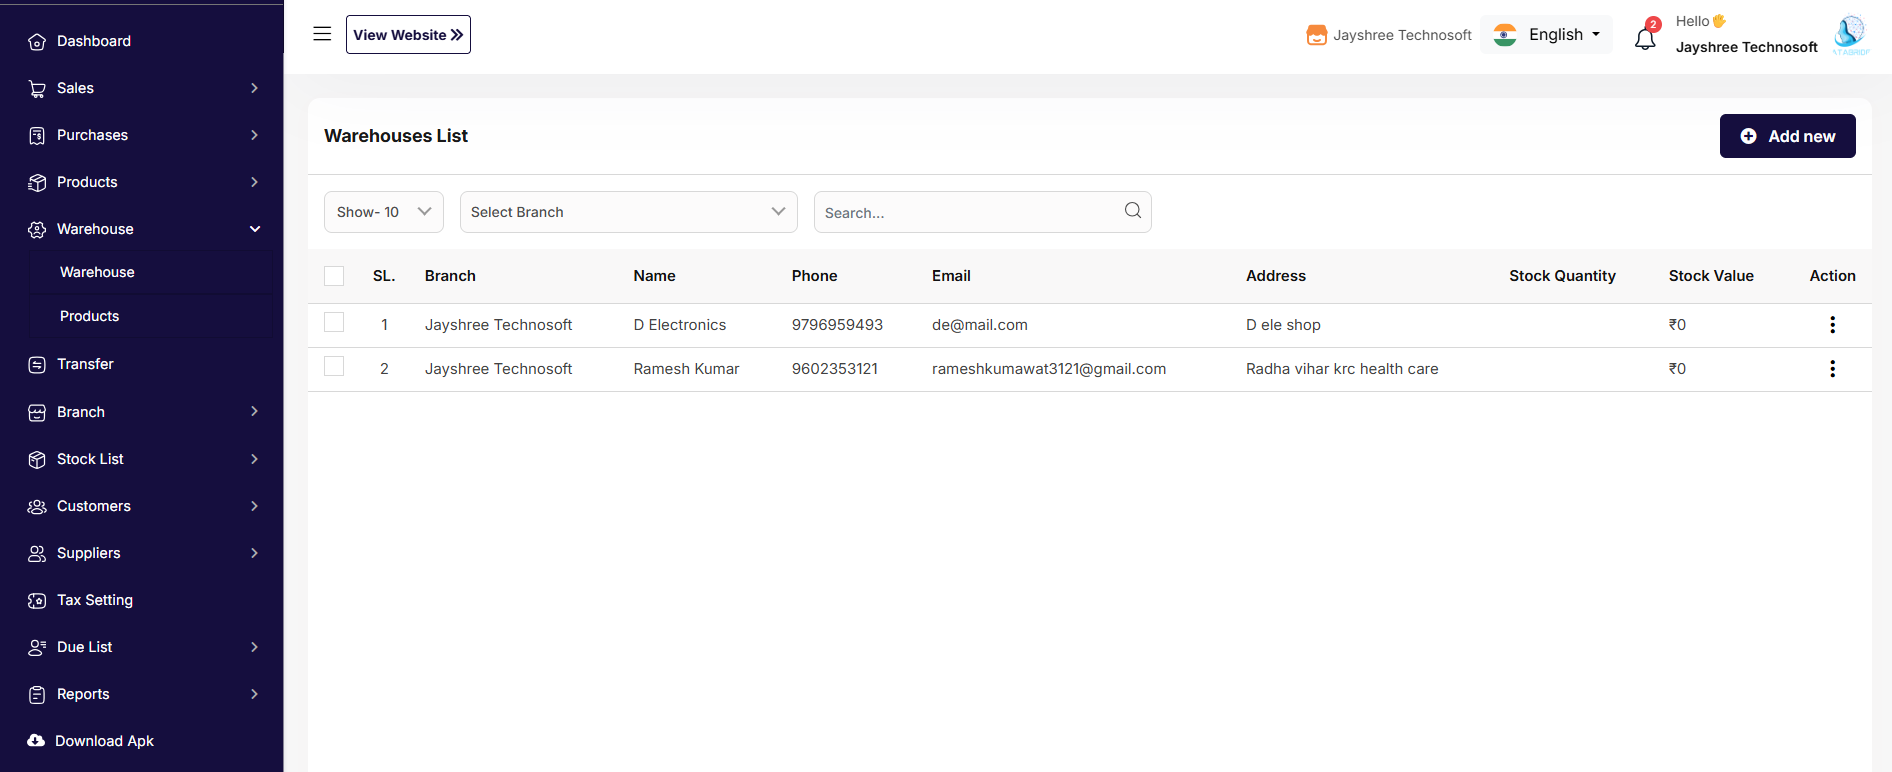
Manage multiple warehouses and track stock branch-wise.
Warehouse List
Manage multiple warehouses and track stock branch-wise.
Manage multiple warehouses and track stock branch-wise.
1
Warehouse
2
Warehouse List
ADD WAREHOUSE – Step-by-Step Process
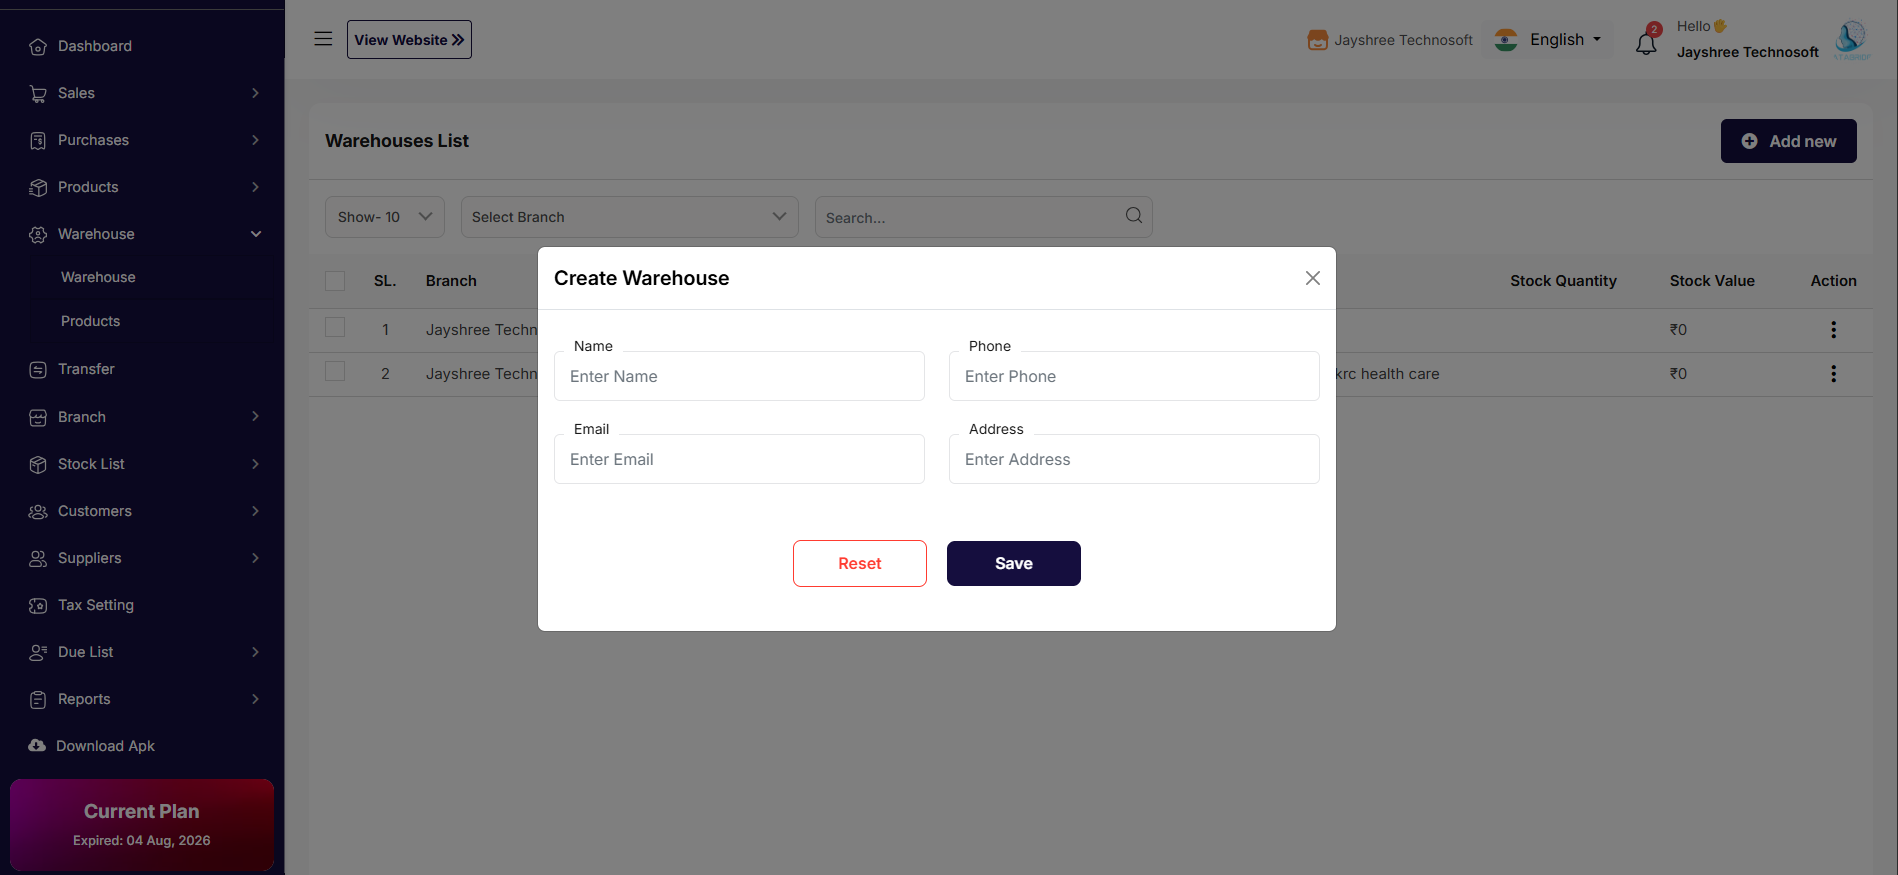
1
Warehouse
2
Add New
3
Enter Warehouse Details
4
Select Branch
5
Save Warehouse
Step 1: Enter Warehouse Details
Enter Warehouse Name
Enter warehouse address (if applicable)
Add contact details (optional)
Step 2: Select Branch
Choose the branch from dropdown to link the warehouse.
✔ Each warehouse can be assigned to a specific branch
✔ Helps in branch-wise stock tracking
Step 3: Save Warehouse
Click Save to create the warehouse.
✔ Warehouse will be added to the system
✔ It will appear in stock transfer and inventory modules
Enter Warehouse Name
Enter warehouse address (if applicable)
Add contact details (optional)
Step 2: Select Branch
Choose the branch from dropdown to link the warehouse.
✔ Each warehouse can be assigned to a specific branch
✔ Helps in branch-wise stock tracking
Step 3: Save Warehouse
Click Save to create the warehouse.
✔ Warehouse will be added to the system
✔ It will appear in stock transfer and inventory modules
Stock Management
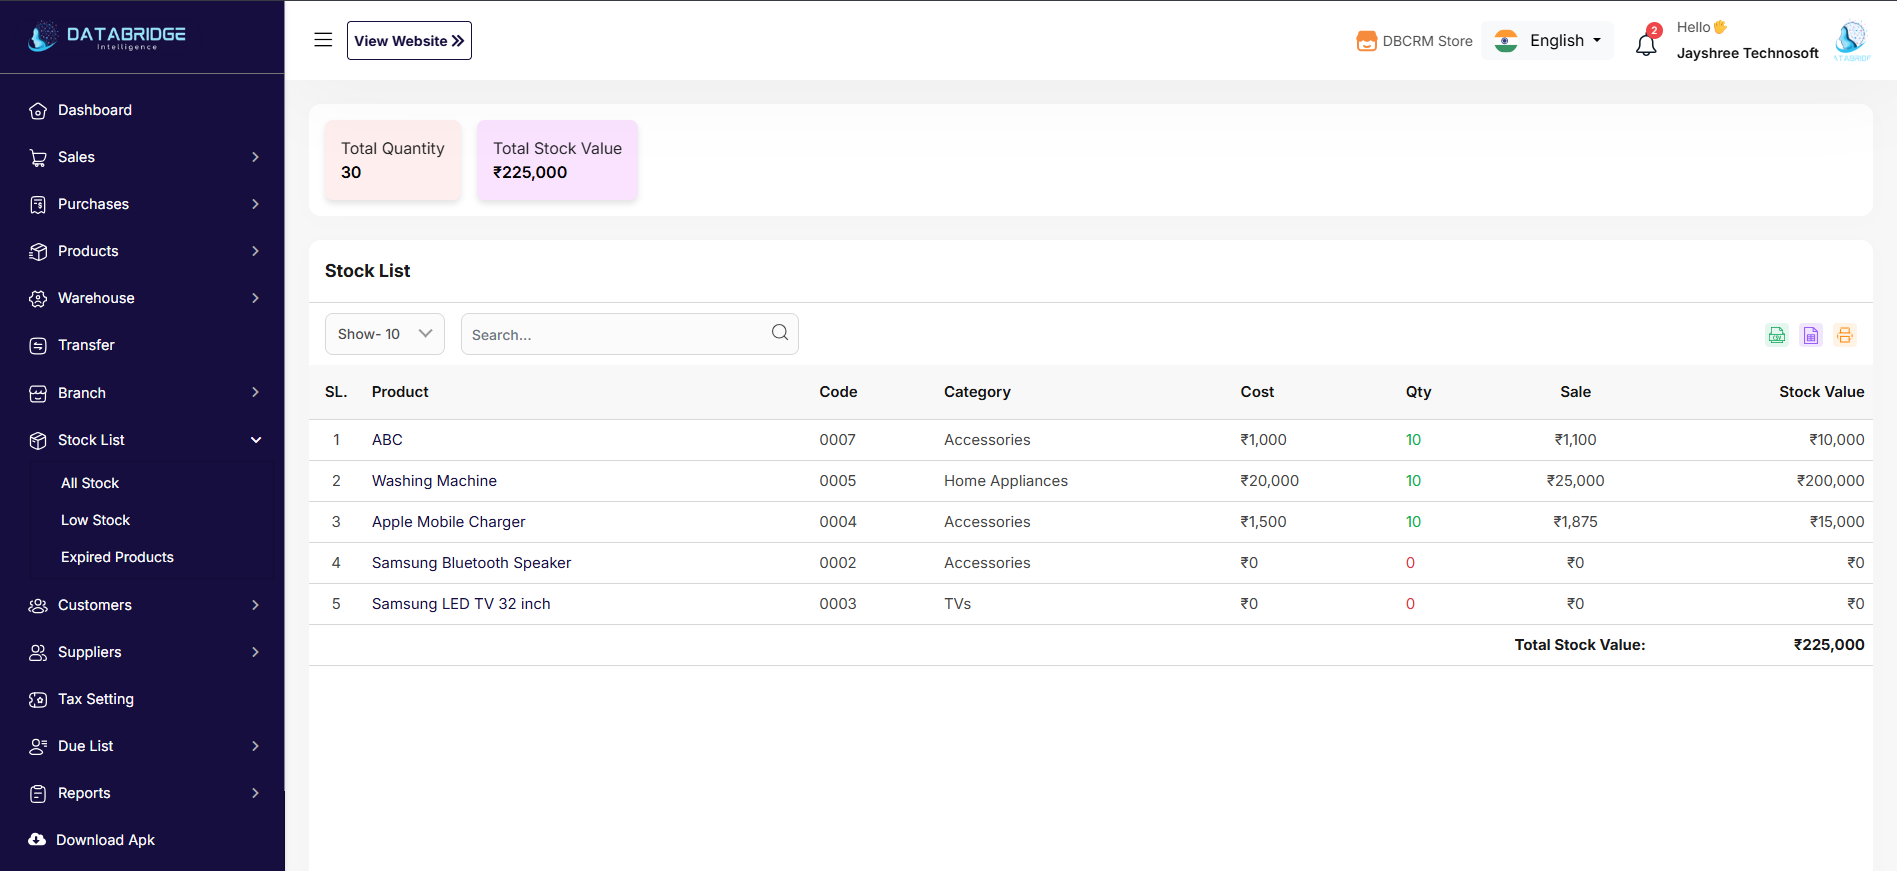
Displays real-time stock status of all products across warehouses and branches.
📝 Manage all products including price, stock, category and brand details.
🔹 Add Product
(Create new product)
🔹 Category
(Manage product categories)
🔹 Brand
(Manage product brands)
🔹 Model
(Add product model details)
🔹 Variation
(Add size, color or variation options)
🔹 Unit
(Set unit like piece, kg etc.)
🔹 Bulk Upload
(Add products via Excel file)
🔹 Print Labels
(Print barcode or product labels)
🔹 Expired Products
(View expired items list)
🔹 Add Product
(Create new product)
🔹 Category
(Manage product categories)
🔹 Brand
(Manage product brands)
🔹 Model
(Add product model details)
🔹 Variation
(Add size, color or variation options)
🔹 Unit
(Set unit like piece, kg etc.)
🔹 Bulk Upload
(Add products via Excel file)
🔹 Print Labels
(Print barcode or product labels)
🔹 Expired Products
(View expired items list)
🔹 Add Warehouse
(Create new warehouse)
🔹 Select Branch
(Link warehouse with branch)
🔹 Stock View
(View warehouse stock details)
(Create new warehouse)
🔹 Select Branch
(Link warehouse with branch)
🔹 Stock View
(View warehouse stock details)
Stock Management
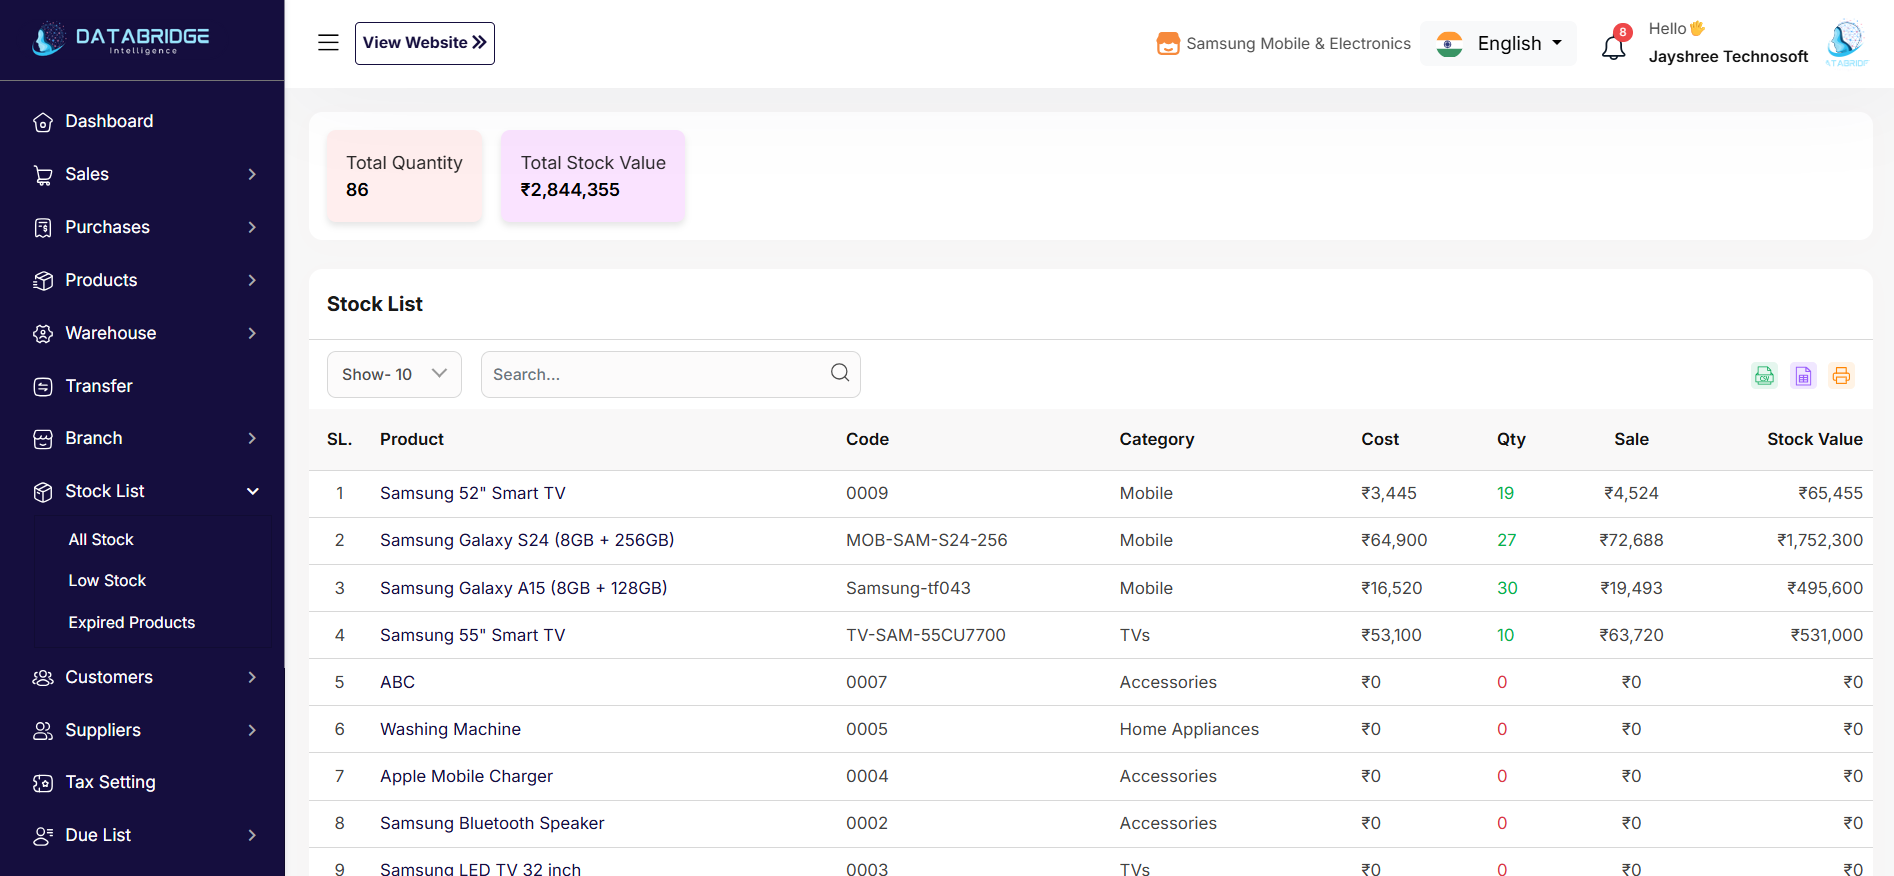
Shows real-time stock status of all products.
🔹 All Stock
(View complete stock)
🔹 Low Stock
(View products below alert level)
🔹 Expired Products
(View expired items)
🔹 Transfer
(Move stock between branches)
(View complete stock)
🔹 Low Stock
(View products below alert level)
🔹 Expired Products
(View expired items)
🔹 Transfer
(Move stock between branches)
Transfer
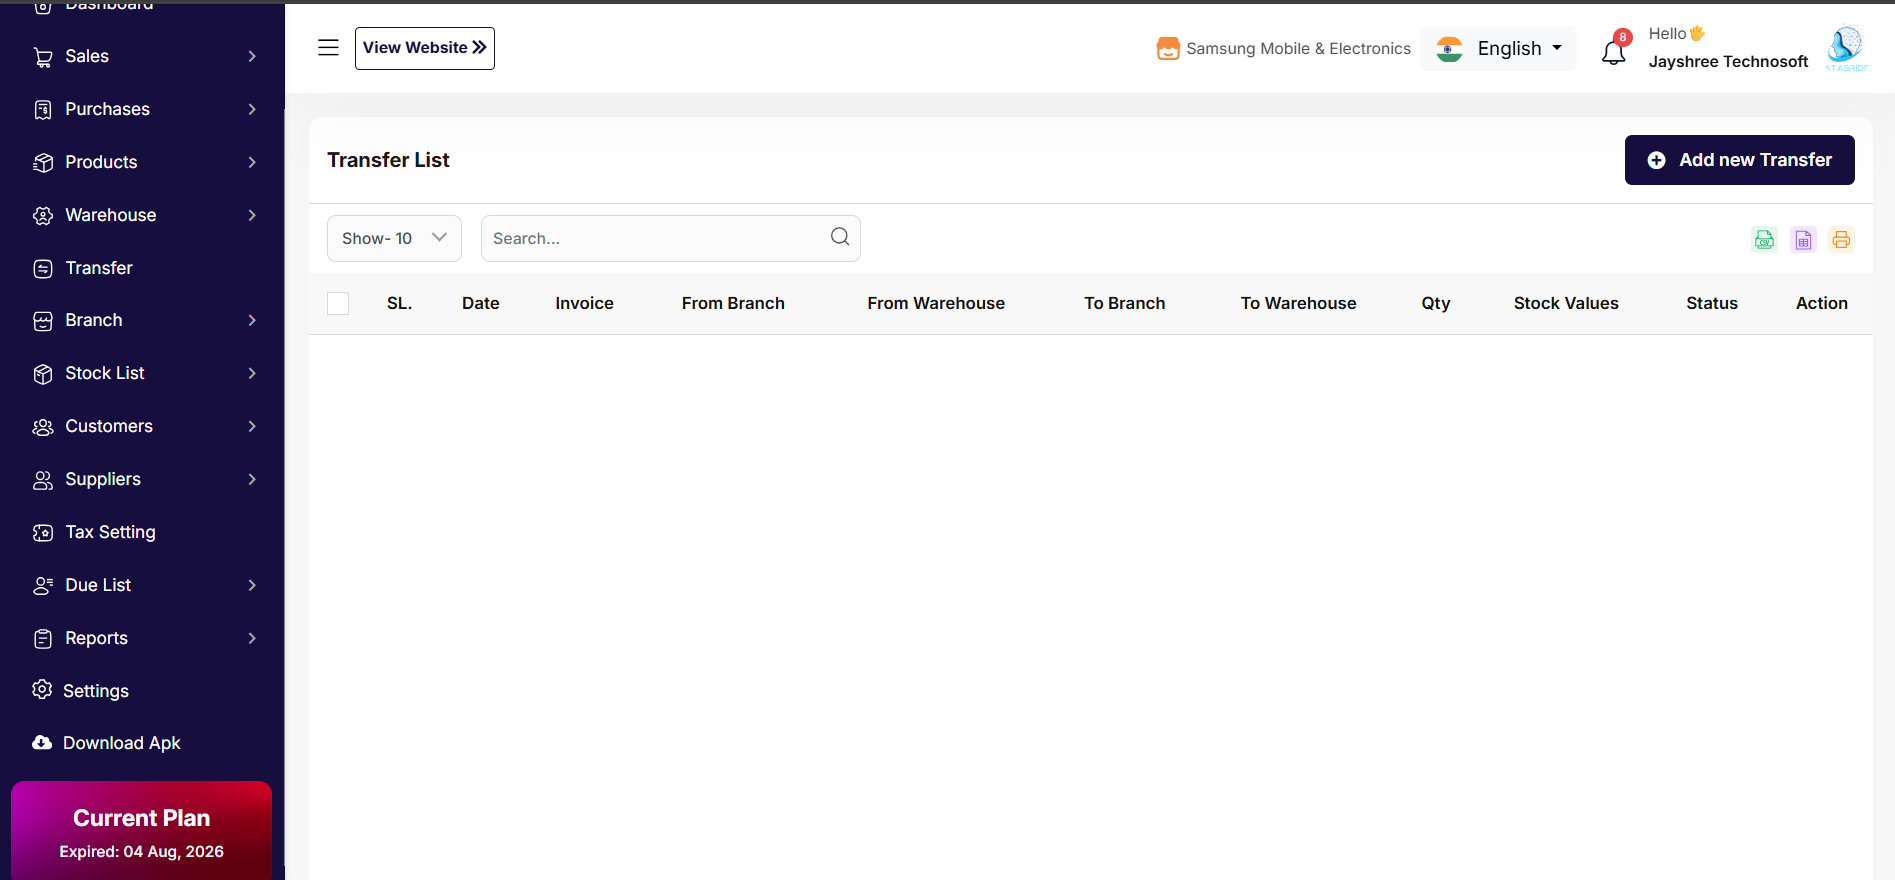
Used to transfer products from one branch or warehouse to another.
🔹 From Branch
(Select source branch)
🔹 To Branch
(Select destination branch)
🔹 Transfer History
(View past transfers)
(Select source branch)
🔹 To Branch
(Select destination branch)
🔹 Transfer History
(View past transfers)
Branch Management
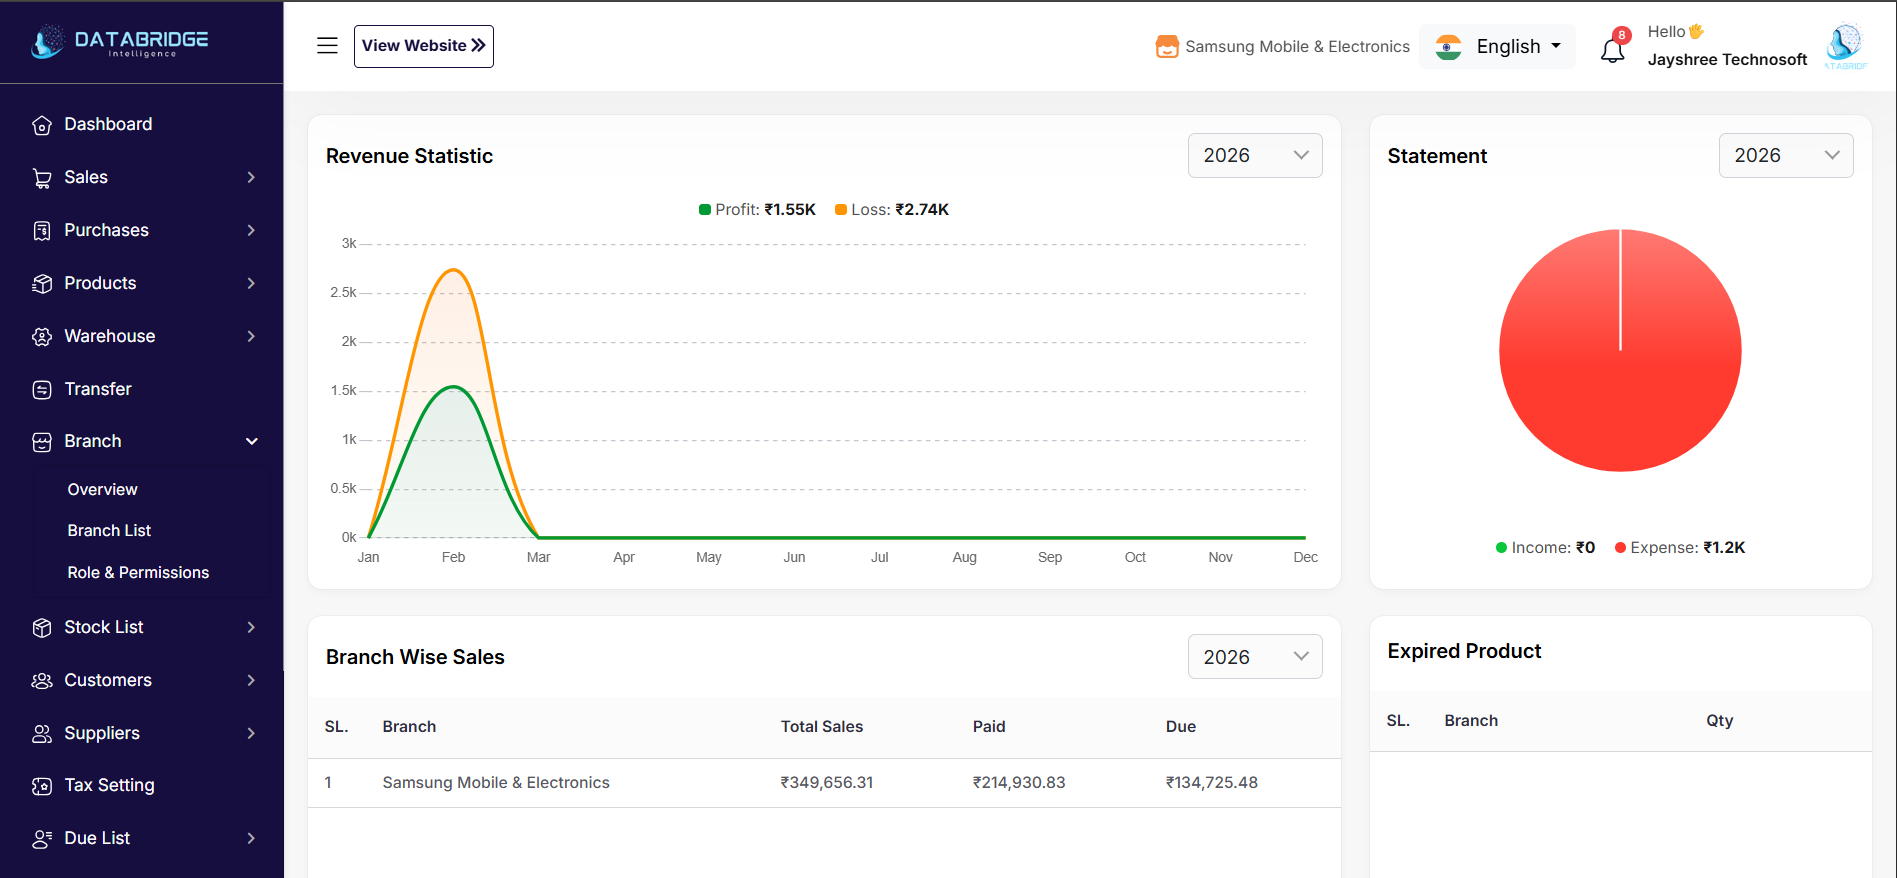
Manage multi-branch system and branch performance.
🔹 Branch List
(View all branches)
🔹 Role & Permissions
(Assign access rights to users)
(View all branches)
🔹 Role & Permissions
(Assign access rights to users)
Customer Management
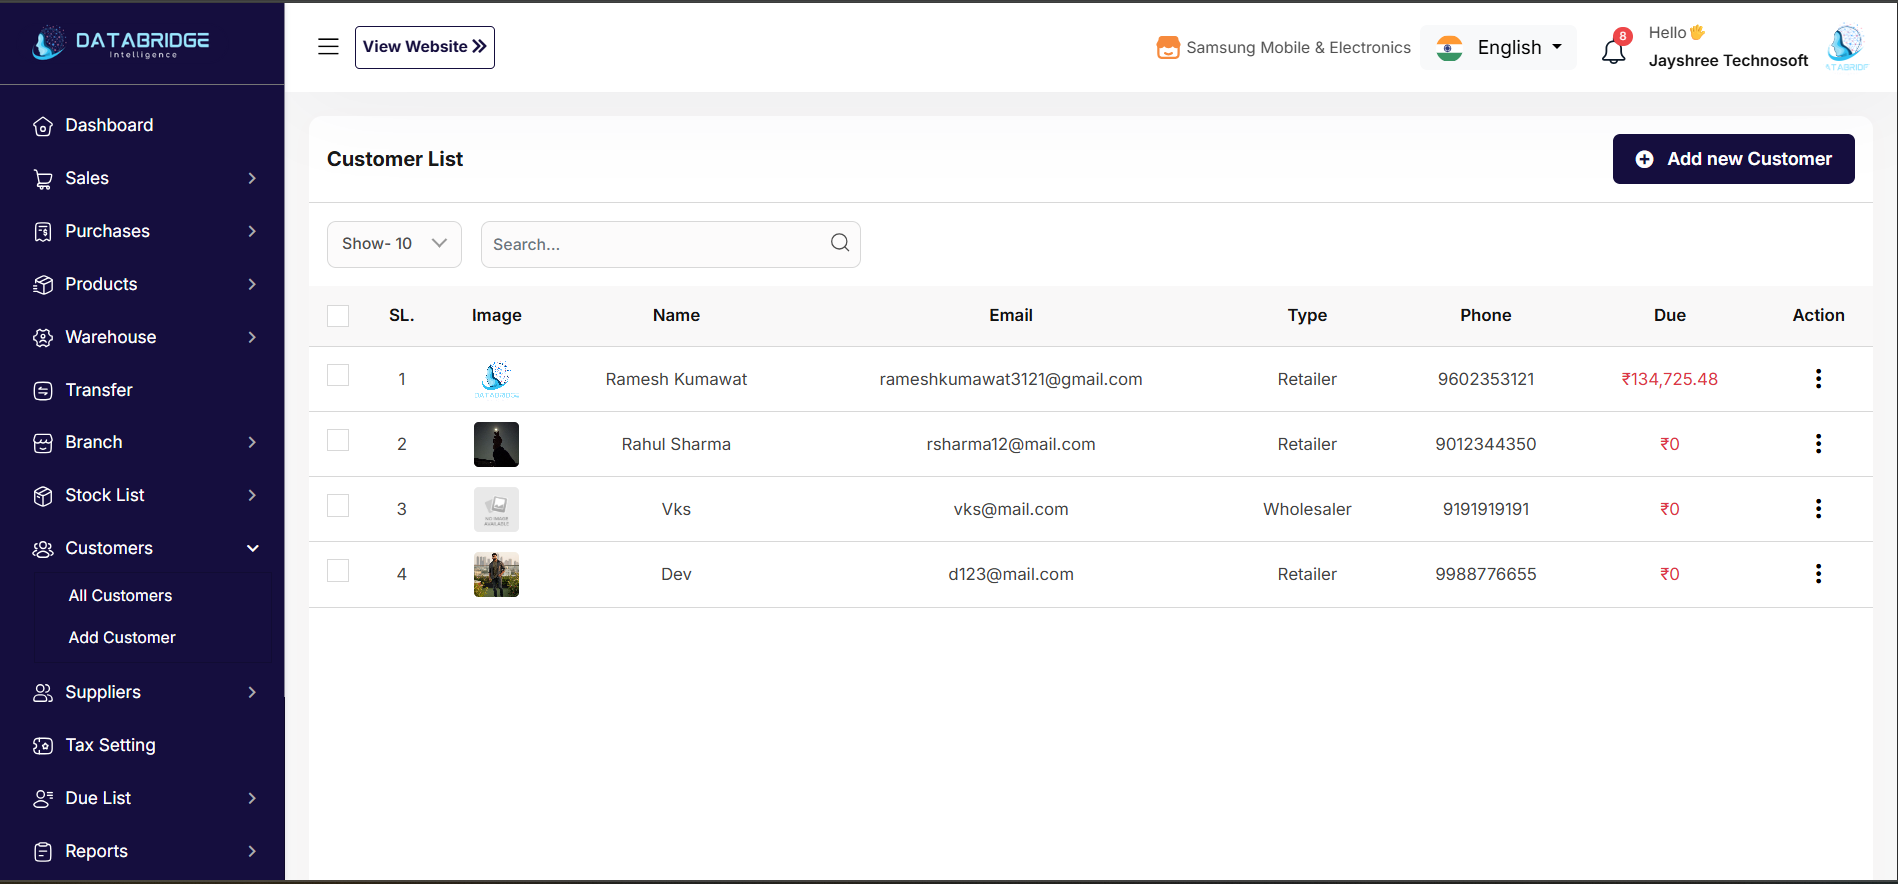
Manages all customer details and tracks due balances.
🔹 Add Customer
(Add new customer to system)
🔹 Customer Type
(Set customer category like retailer or wholesaler)
🔹 Due Amount
(View customers with pending payment)
🔹 Edit / Delete
(Update or remove customer profile)
(Add new customer to system)
🔹 Customer Type
(Set customer category like retailer or wholesaler)
🔹 Due Amount
(View customers with pending payment)
🔹 Edit / Delete
(Update or remove customer profile)
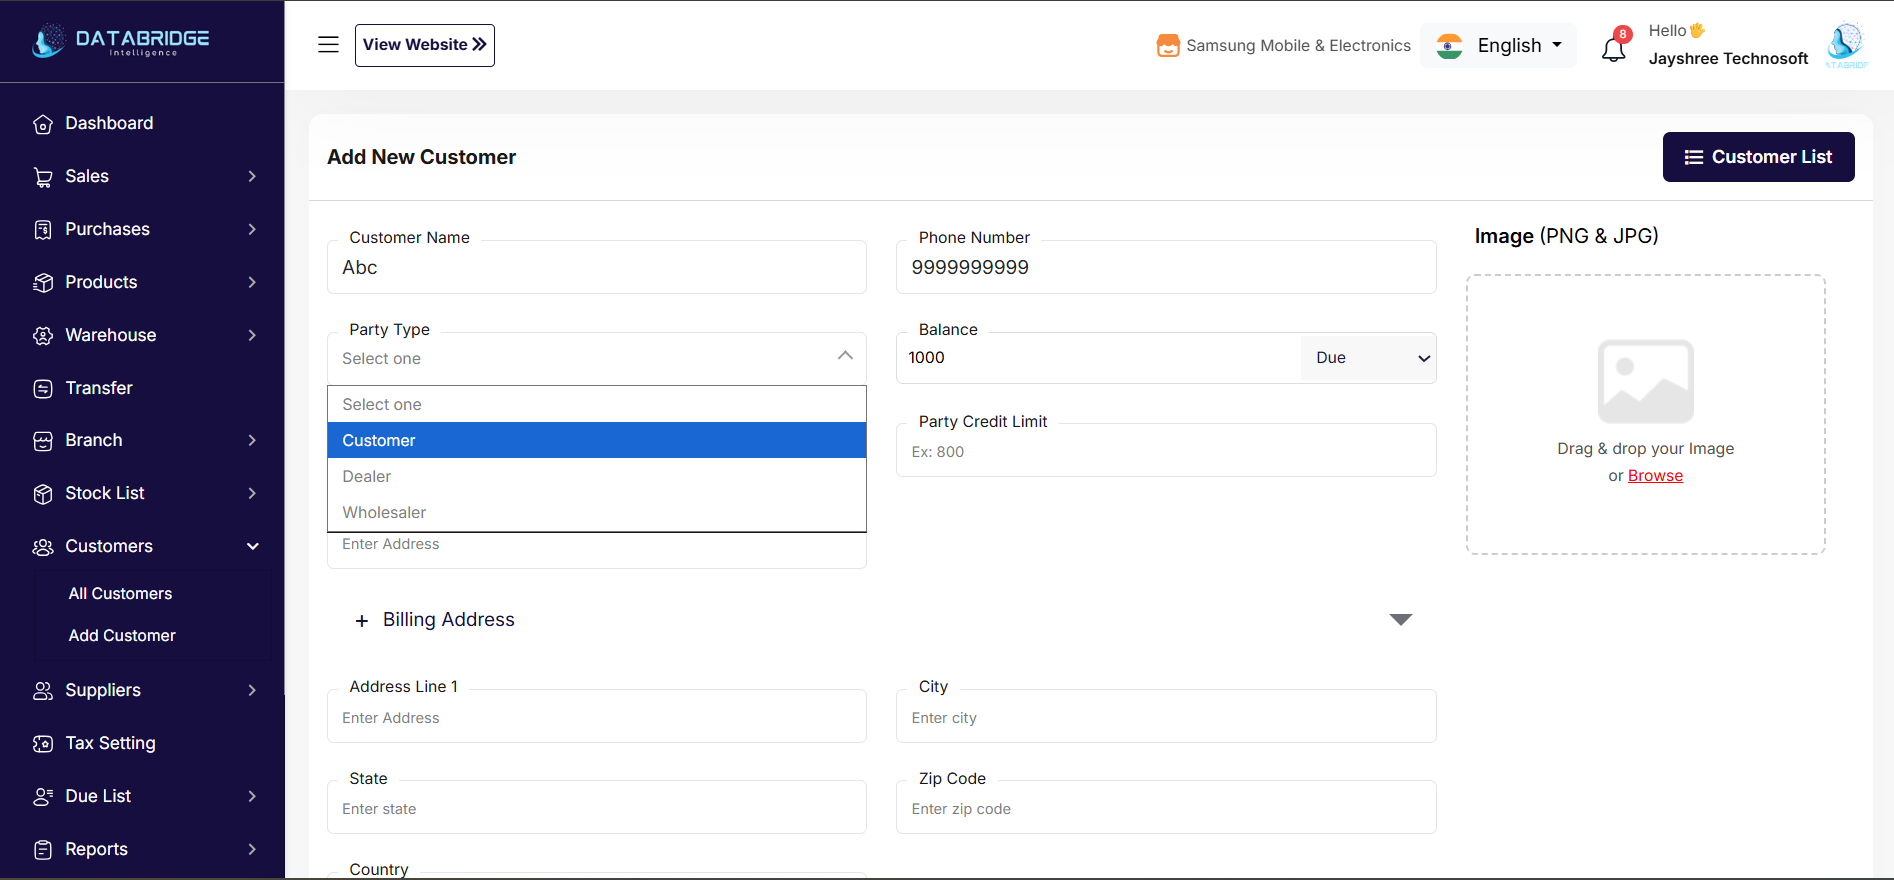
Step-by-Step Process to Add Customer
➤ Step 1: Go to Customer Section
Dashboard > Customers > Add Customer
(Open the Add Customer form to create a new customer profile.)
➤ Step 2: Enter Customer Name
(Customer Name field)
Enter the full name of the customer or business.
➤ Step 3: Enter Phone Number
(Phone Number field)
Provide a valid mobile number for billing and contact purposes.
➤ Step 4: Select Party Type
(Party Type dropdown)
Choose customer category:
• Customer
• Dealer
• Wholesaler
(This helps in pricing, reporting and due classification.)
➤ Step 5: Set Opening Balance
(Balance field)
Enter the existing balance amount (if any).
Then choose balance type:
• Due → Customer has to pay you
• Advance → You owe the customer
➤ Step 6: Set Party Credit Limit
(Party Credit Limit field – Optional)
Define the maximum credit amount allowed for this customer.
(System can restrict billing beyond this limit.)
➤ Step 7: Upload Customer Image (Optional)
(Image upload section)
Drag & drop or browse image (PNG / JPG).
(Useful for easy identification.)
➤ Step 8: Enter Billing Address
Click Billing Address section and fill:
• Address Line
• City
• State
• Zip Code
• Country
(Used for invoice printing and GST billing.)
➤ Step 9: Save Customer
Click Save / Submit button.
Customer will now appear in Customer List.
➤ Step 1: Go to Customer Section
Dashboard > Customers > Add Customer
(Open the Add Customer form to create a new customer profile.)
➤ Step 2: Enter Customer Name
(Customer Name field)
Enter the full name of the customer or business.
➤ Step 3: Enter Phone Number
(Phone Number field)
Provide a valid mobile number for billing and contact purposes.
➤ Step 4: Select Party Type
(Party Type dropdown)
Choose customer category:
• Customer
• Dealer
• Wholesaler
(This helps in pricing, reporting and due classification.)
➤ Step 5: Set Opening Balance
(Balance field)
Enter the existing balance amount (if any).
Then choose balance type:
• Due → Customer has to pay you
• Advance → You owe the customer
➤ Step 6: Set Party Credit Limit
(Party Credit Limit field – Optional)
Define the maximum credit amount allowed for this customer.
(System can restrict billing beyond this limit.)
➤ Step 7: Upload Customer Image (Optional)
(Image upload section)
Drag & drop or browse image (PNG / JPG).
(Useful for easy identification.)
➤ Step 8: Enter Billing Address
Click Billing Address section and fill:
• Address Line
• City
• State
• Zip Code
• Country
(Used for invoice printing and GST billing.)
➤ Step 9: Save Customer
Click Save / Submit button.
Customer will now appear in Customer List.
Supplier Management
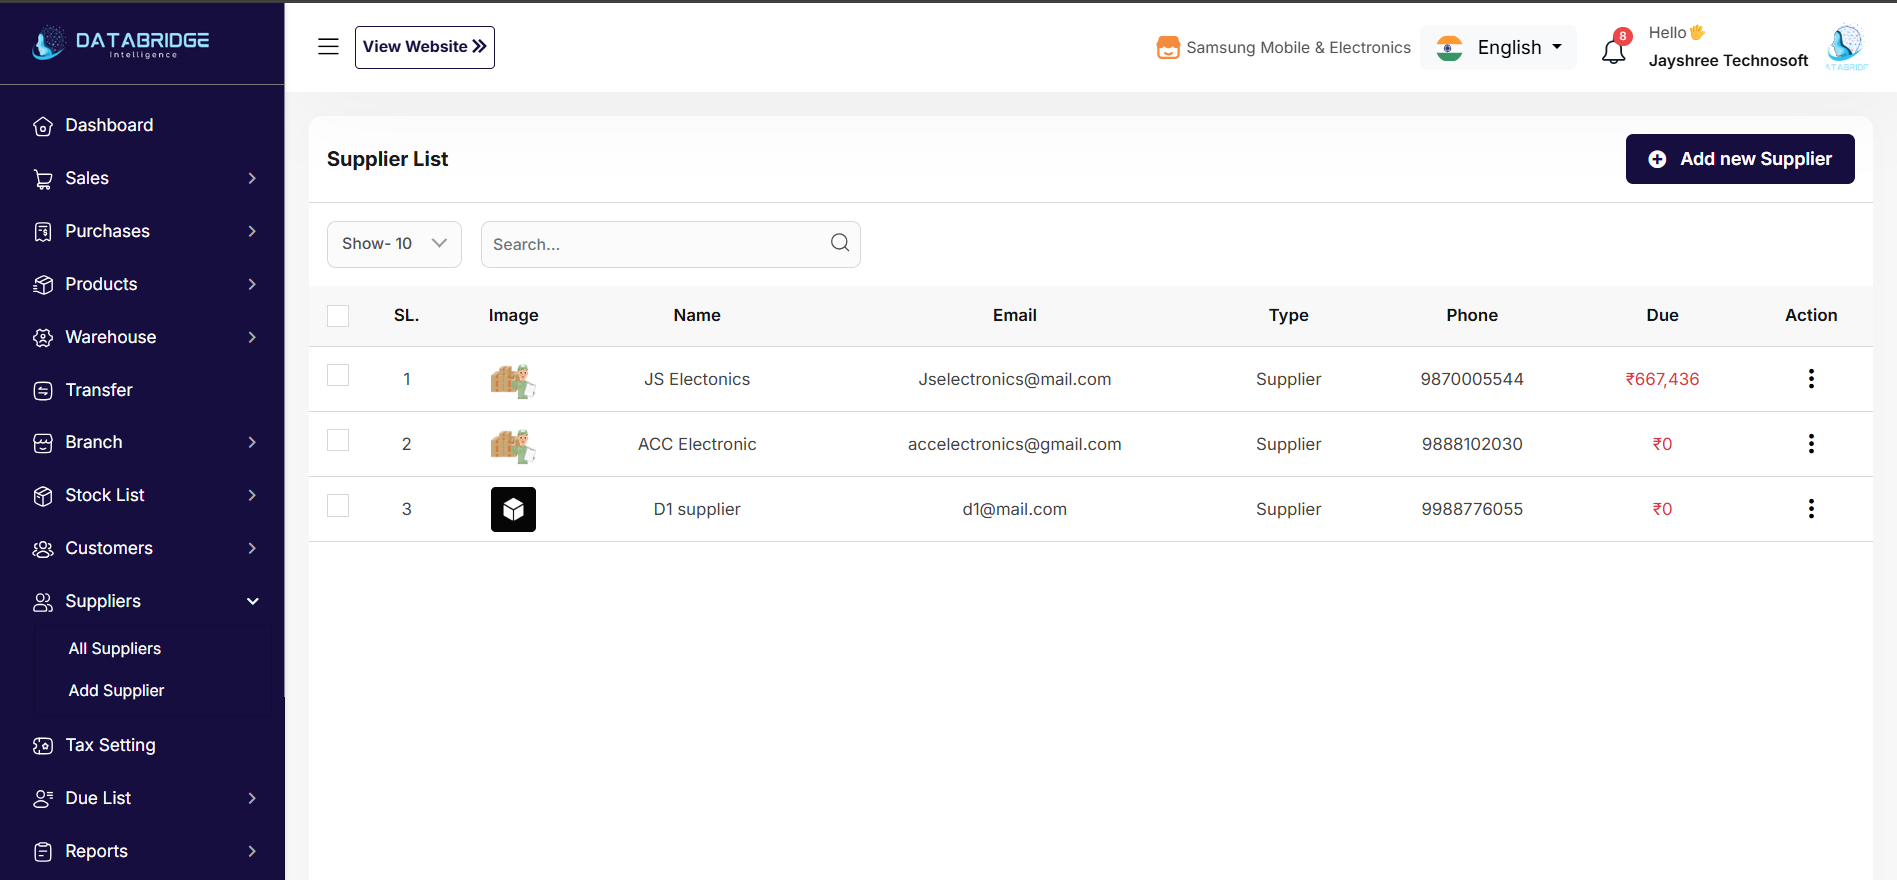
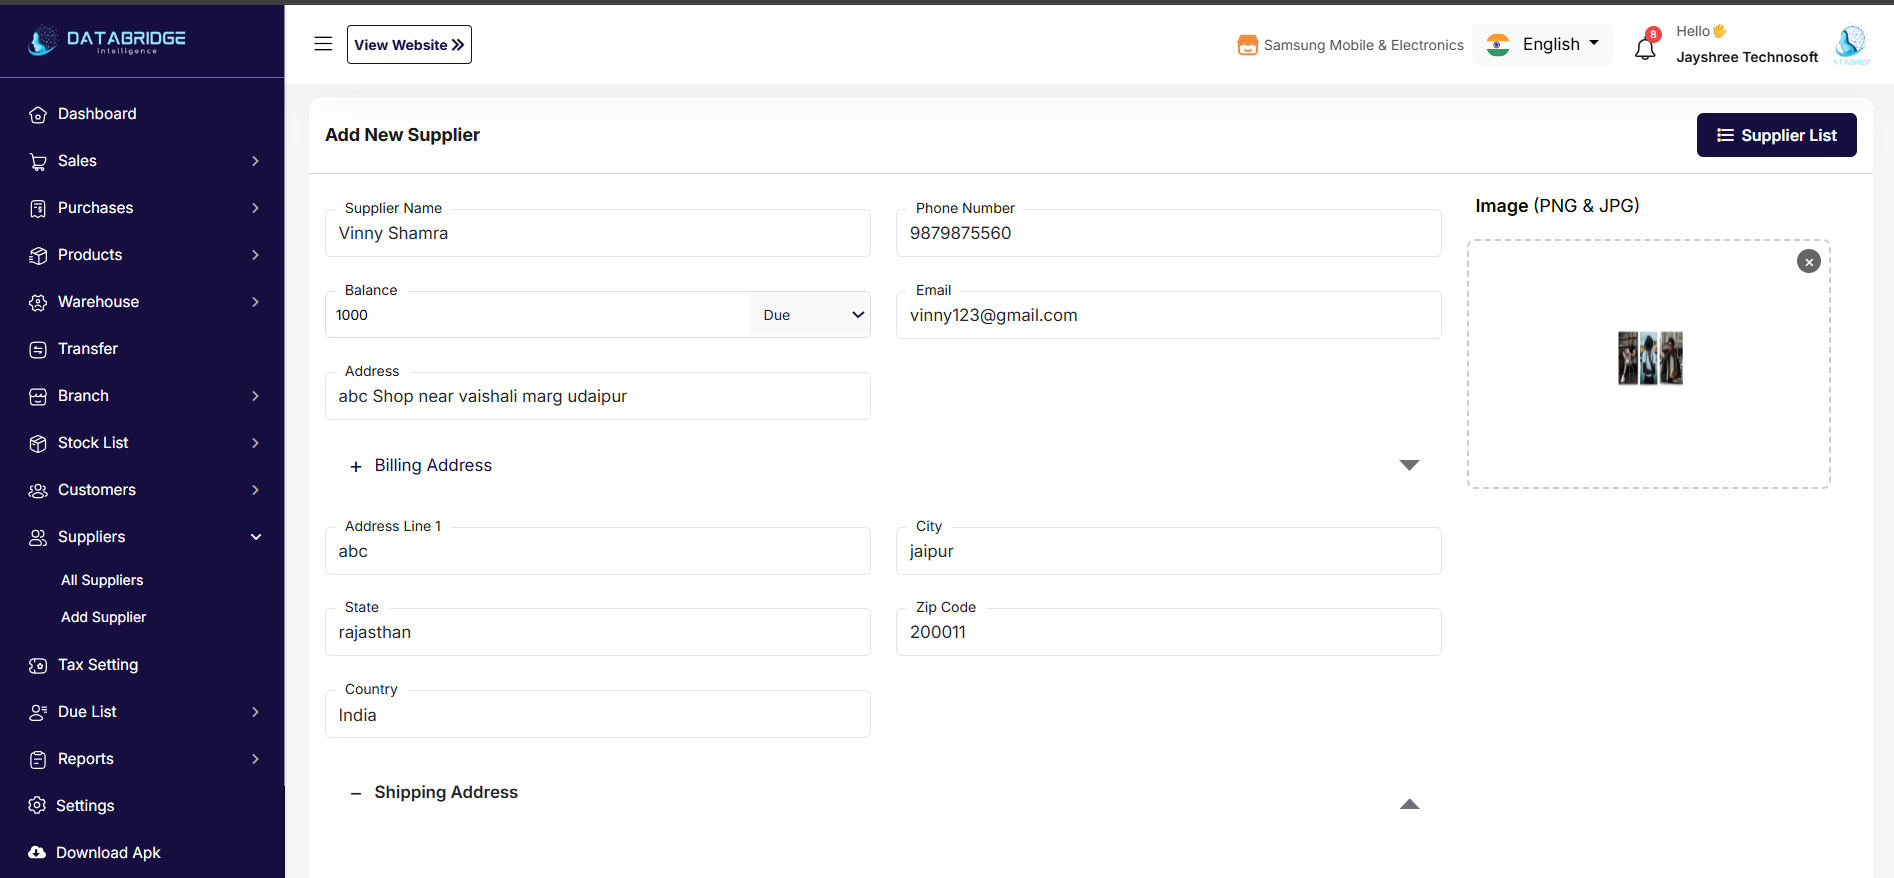
This option allows you to create and manage supplier profiles, track supplier dues, and manage purchase-related transactions.
1
Dashboard
2
Suppliers
3
Add Supplier
4
Enter Supplier Name
5
Enter Contact Details
6
Set Supplier Type
7
Enter Opening Balance
8
Set Credit Limit (Optional)
9
Add Address Details
10
Upload Image (Optional)
11
Save Supplier
🔹 Step-by-Step Process to Add Supplier
➤ Step 1: Go to Supplier Section
Dashboard > Suppliers > Add Supplier
(Open the Add Supplier form.)
➤ Step 2: Enter Supplier Name
(Supplier Name field)
Enter the company name or supplier’s full name.
➤ Step 3: Enter Contact Details
• Phone Number
• Email Address
(Used for communication and purchase records.)
➤ Step 4: Set Supplier Type
Select type if available (Supplier / Distributor / Dealer).
(Helps in classification and reporting.)
➤ Step 5: Enter Opening Balance
(Balance field)
Enter existing payable amount if any.
Select balance type:
• Due → You have to pay supplier
• Advance → Supplier owes you
➤ Step 6: Set Credit Limit (Optional)
Define maximum purchase credit allowed from this supplier.
➤ Step 7: Add Address Details
Fill:
• Address Line
• City
• State
• Zip Code
• Country
(Required for purchase invoices and GST compliance.)
➤ Step 8: Upload Image (Optional)
Add supplier logo/photo for identification.
➤ Step 9: Save Supplier
Click Save / Submit button.
Supplier will now appear in Supplier List.
➤ Step 1: Go to Supplier Section
Dashboard > Suppliers > Add Supplier
(Open the Add Supplier form.)
➤ Step 2: Enter Supplier Name
(Supplier Name field)
Enter the company name or supplier’s full name.
➤ Step 3: Enter Contact Details
• Phone Number
• Email Address
(Used for communication and purchase records.)
➤ Step 4: Set Supplier Type
Select type if available (Supplier / Distributor / Dealer).
(Helps in classification and reporting.)
➤ Step 5: Enter Opening Balance
(Balance field)
Enter existing payable amount if any.
Select balance type:
• Due → You have to pay supplier
• Advance → Supplier owes you
➤ Step 6: Set Credit Limit (Optional)
Define maximum purchase credit allowed from this supplier.
➤ Step 7: Add Address Details
Fill:
• Address Line
• City
• State
• Zip Code
• Country
(Required for purchase invoices and GST compliance.)
➤ Step 8: Upload Image (Optional)
Add supplier logo/photo for identification.
➤ Step 9: Save Supplier
Click Save / Submit button.
Supplier will now appear in Supplier List.
Due List Management
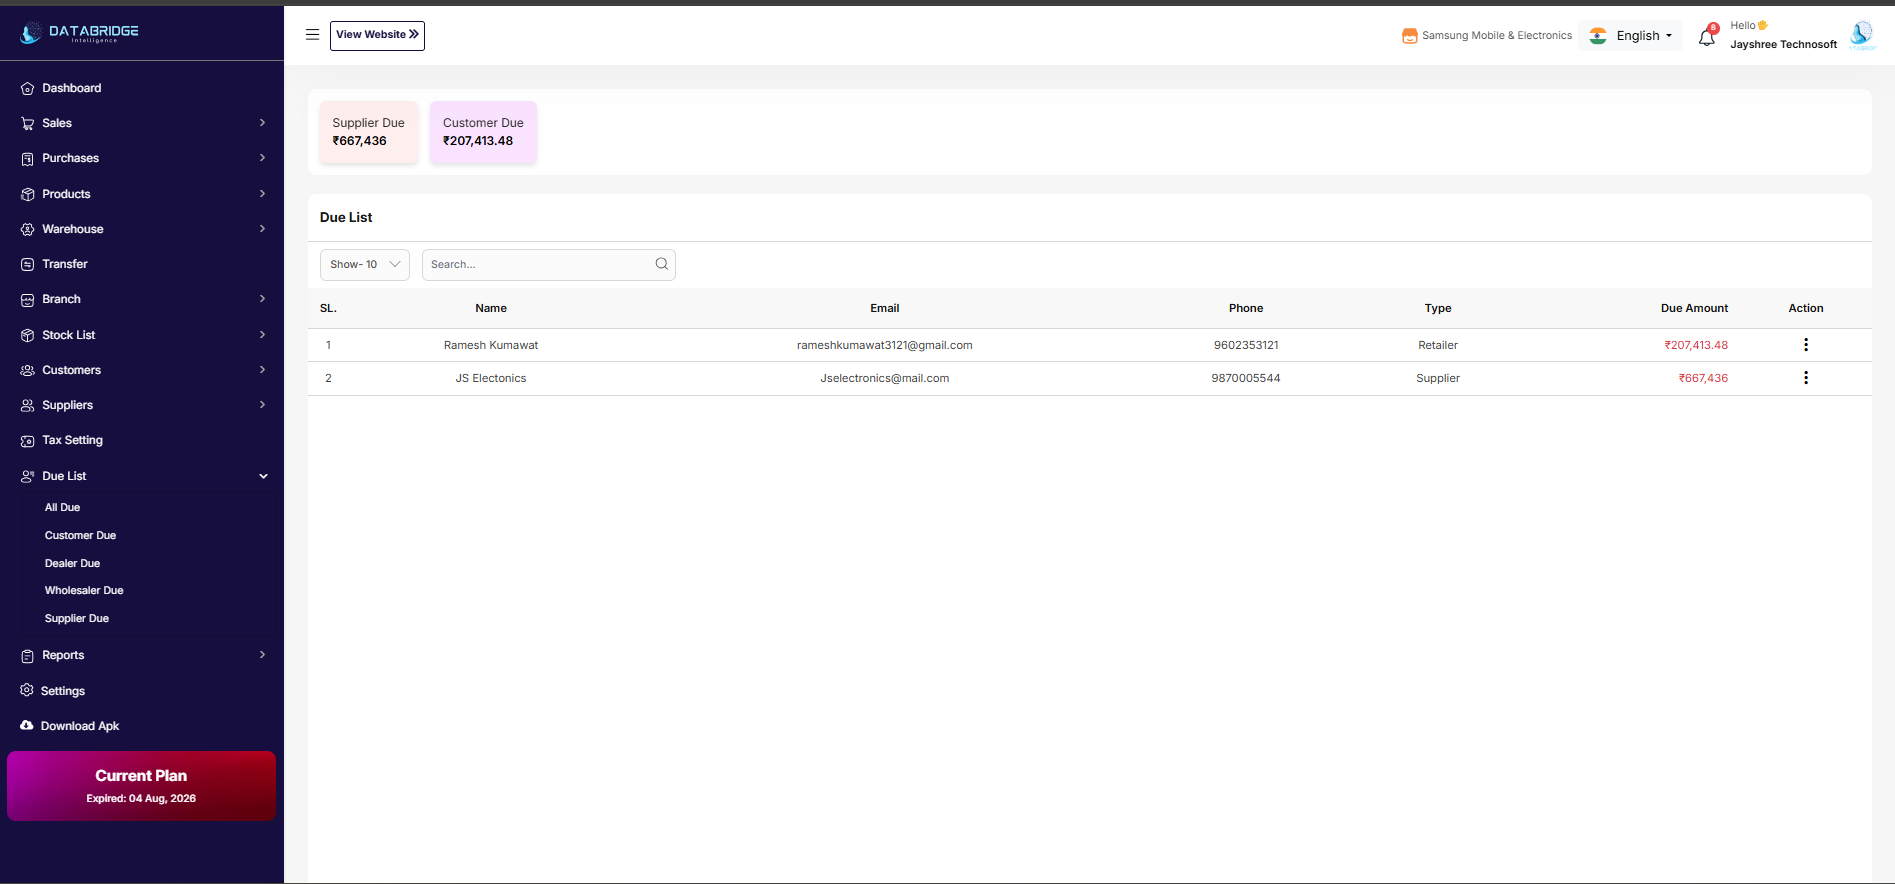
Tracks all pending payments from Customers and Suppliers and helps manage outstanding balances efficiently.
🔹 All Due
(View complete list of all pending dues including customers and suppliers.)
🔹 Customer Due
(Displays only customers who have outstanding payment.)
🔹 Dealer Due
(Shows pending balances of dealer-type customers.)
🔹 Wholesaler Due
(View dues specifically for wholesaler category customers.)
🔹 Supplier Due
(Track outstanding payments that you need to pay to suppliers.)
🔹 Search & Filter
(Quickly find a specific party using name, phone number, or type filter.)
🔹 Action Menu (⋮)
(Receive payment, adjust due amount, or view transaction history.)
(View complete list of all pending dues including customers and suppliers.)
🔹 Customer Due
(Displays only customers who have outstanding payment.)
🔹 Dealer Due
(Shows pending balances of dealer-type customers.)
🔹 Wholesaler Due
(View dues specifically for wholesaler category customers.)
🔹 Supplier Due
(Track outstanding payments that you need to pay to suppliers.)
🔹 Search & Filter
(Quickly find a specific party using name, phone number, or type filter.)
🔹 Action Menu (⋮)
(Receive payment, adjust due amount, or view transaction history.)
Reports Management
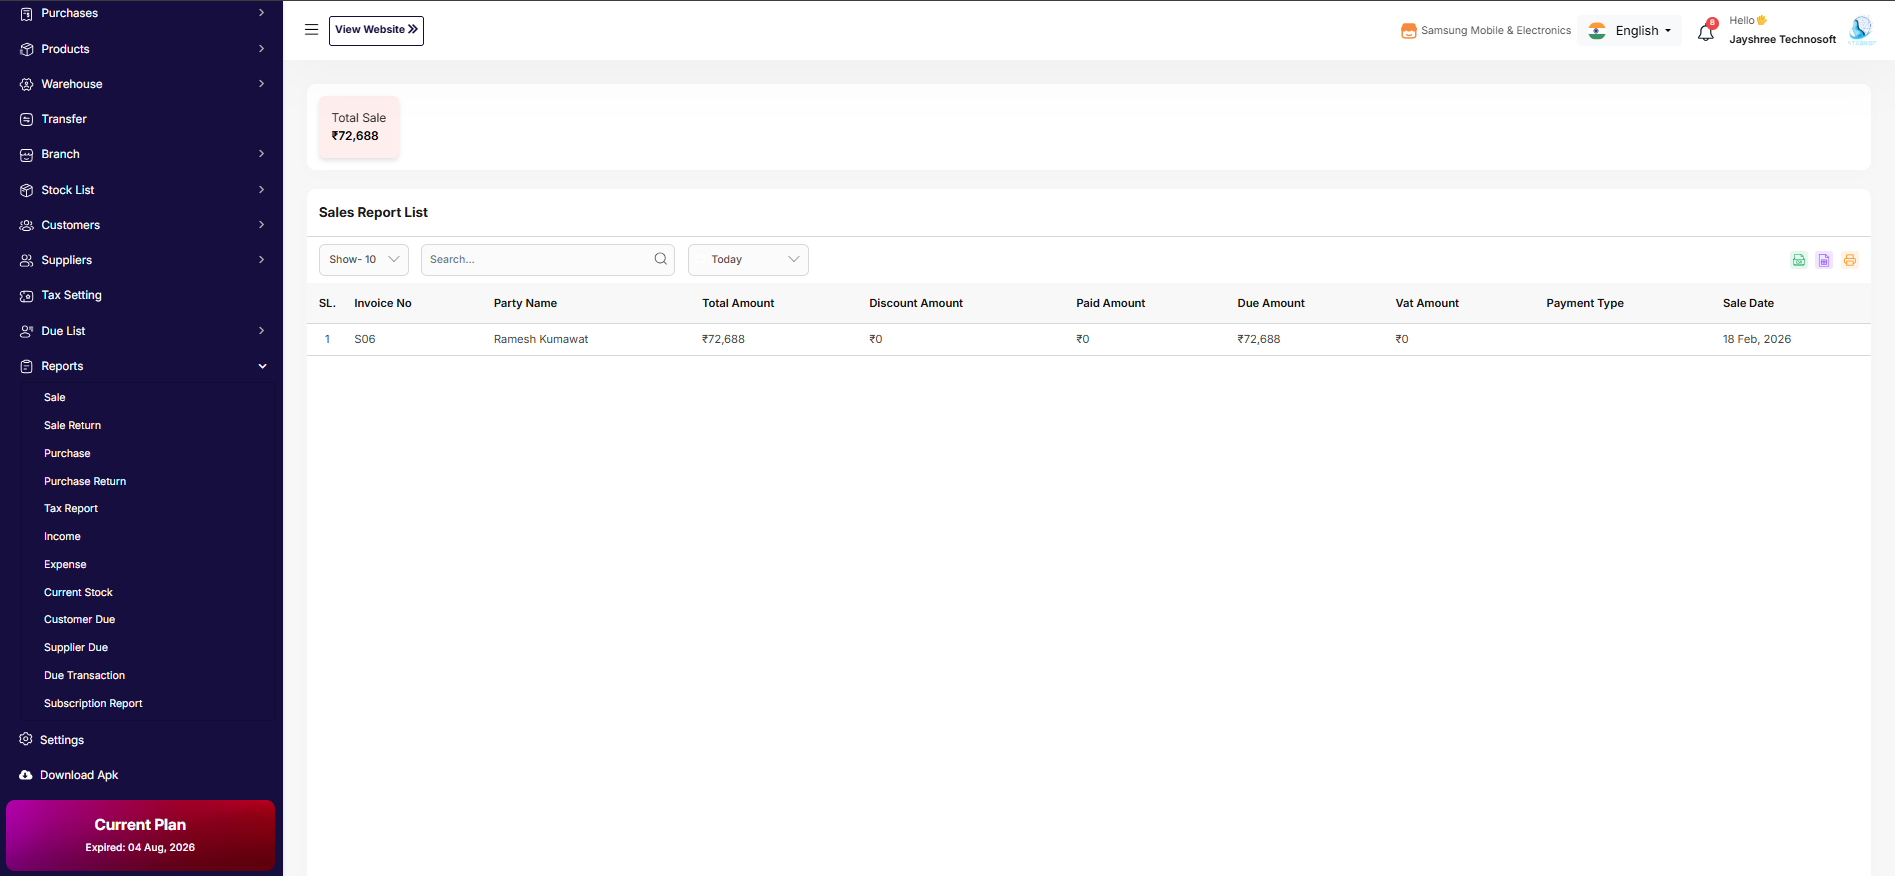
Provides complete financial and inventory reports to analyze business performance and make informed decisions.
🔹 Sales Report
(View invoice-wise sales details including total, discount, paid, due, VAT, and payment type.)
🔹 Sales Return Report
(Track returned sales and adjusted invoice amounts.)
🔹 Purchase Report
(Monitor all purchase transactions with supplier details.)
🔹 Purchase Return Report
(View returned purchase entries and stock adjustments.)
🔹 Tax Report
(Generate GST/VAT based reports for accounting and compliance.)
🔹 Income Report
(Track total income generated from sales and other sources.)
🔹 Expense Report
(View all business expenses recorded in the system.)
🔹 Current Stock Report
(Check real-time stock quantity for all products.)
🔹 Customer Due Report
(Generate report of all customer pending balances.)
🔹 Supplier Due Report
(View total outstanding supplier payments.)
🔹 Due Transaction Report
(Track payment history and due adjustments.)
🔹 Subscription Report
(Monitor plan details, expiry date, and subscription status.)
(View invoice-wise sales details including total, discount, paid, due, VAT, and payment type.)
🔹 Sales Return Report
(Track returned sales and adjusted invoice amounts.)
🔹 Purchase Report
(Monitor all purchase transactions with supplier details.)
🔹 Purchase Return Report
(View returned purchase entries and stock adjustments.)
🔹 Tax Report
(Generate GST/VAT based reports for accounting and compliance.)
🔹 Income Report
(Track total income generated from sales and other sources.)
🔹 Expense Report
(View all business expenses recorded in the system.)
🔹 Current Stock Report
(Check real-time stock quantity for all products.)
🔹 Customer Due Report
(Generate report of all customer pending balances.)
🔹 Supplier Due Report
(View total outstanding supplier payments.)
🔹 Due Transaction Report
(Track payment history and due adjustments.)
🔹 Subscription Report
(Monitor plan details, expiry date, and subscription status.)
Settings Management
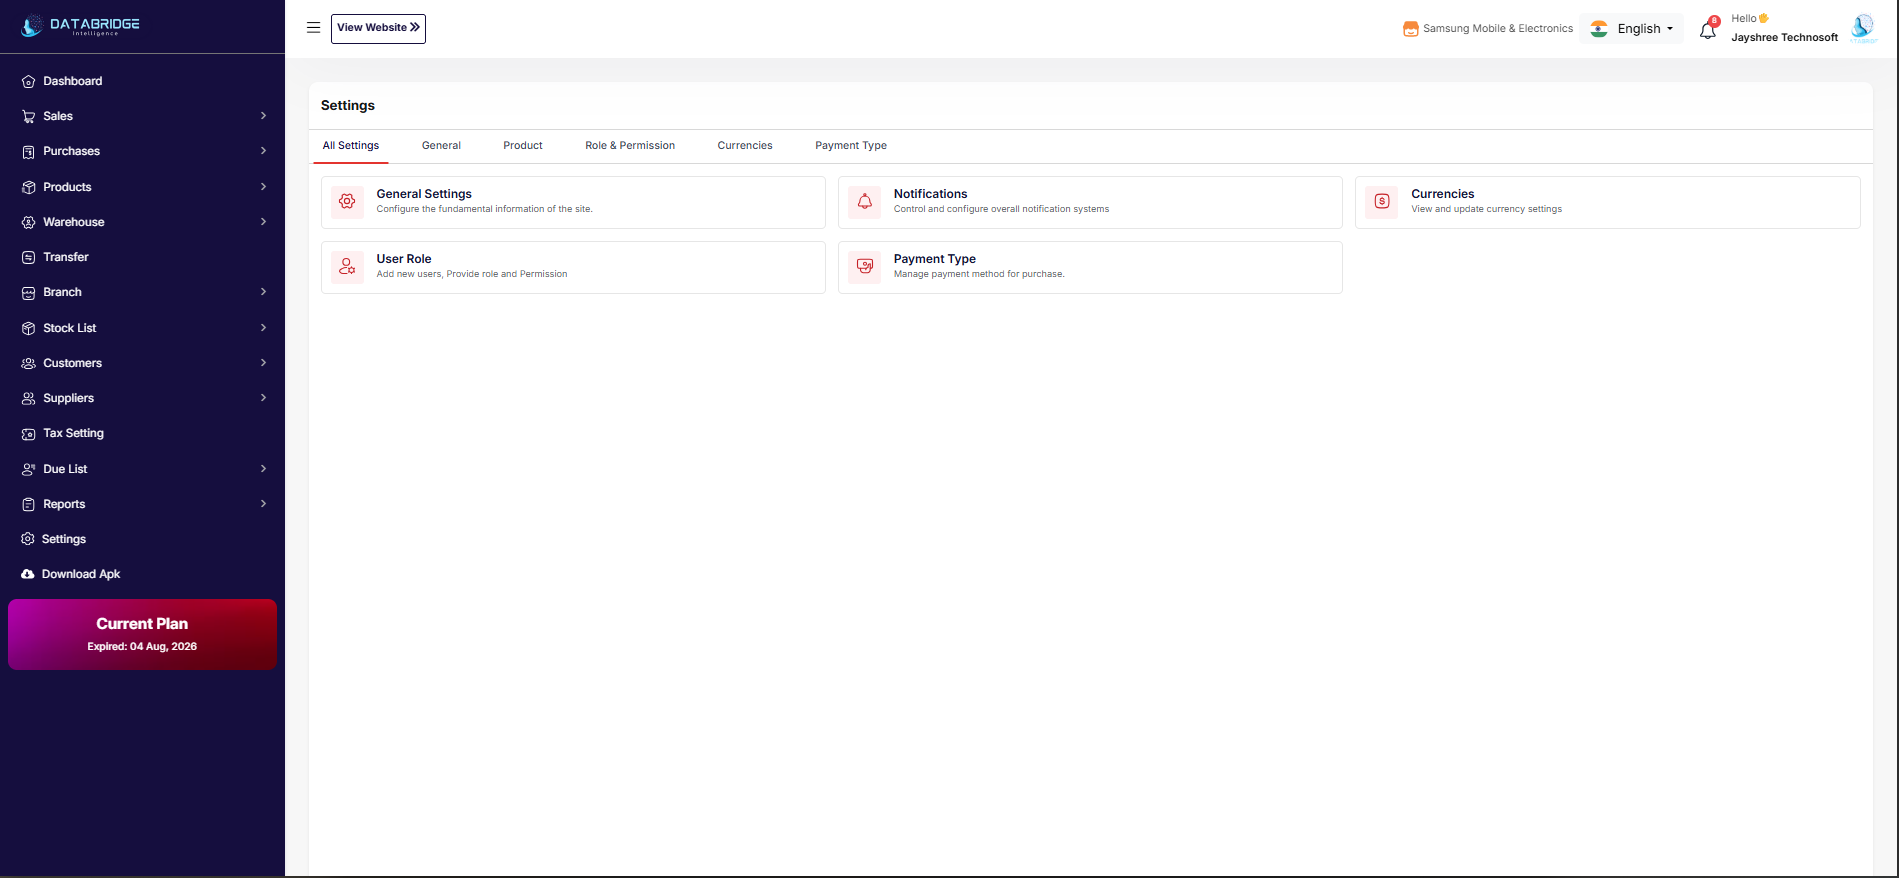
Configure system preferences, user access, currency, notifications, and overall business setup.
🔹 General Settings
(Update company name, logo, contact details, and basic configuration.)
🔹 Notifications
(Enable or disable system alerts and important updates.)
🔹 User Role
(Create roles and assign permissions to staff members.)
🔹 Role & Permission
(Control access level for different users in the system.)
🔹 Currencies
(Set default currency and manage currency settings.)
🔹 Payment Type
(Add or manage available payment methods like Cash, UPI, Card, etc.)
(Update company name, logo, contact details, and basic configuration.)
🔹 Notifications
(Enable or disable system alerts and important updates.)
🔹 User Role
(Create roles and assign permissions to staff members.)
🔹 Role & Permission
(Control access level for different users in the system.)
🔹 Currencies
(Set default currency and manage currency settings.)
🔹 Payment Type
(Add or manage available payment methods like Cash, UPI, Card, etc.)